TL;DR:
- Noise pollution in home studios is effectively reduced by good sound insulation and seals.
- Improving doors, windows and walls is essential for optimal sound attenuation and recording quality.
You’re in the middle of a recording session and then you hear it: the neighbors playing music, a car driving by, or roommates walking down the hallway. Noise pollution is one of the biggest frustrations with home studios, and it directly sabotages your recording quality. Good soundproofing solves this problem structurally, ensuring that your space is properly shielded both to the outside and inside. In this guide, you’ll go through the practical steps of soundproofing from preparation to completion.
Table of contents
- Supplies and preparation
- Home studio insulation step-by-step plan
- Different insulation approaches compared
- Testing and optimization of insulation
- Our experience with home studio isolation: what you won’t read in other guides
- Getting started yourself? These products make a difference
- Frequently Asked Questions
Key Insights
| Item | Details |
|---|---|
| Insulate doors first | The door is the weakest spot; invest in this first to prevent sound leaks. |
| Cavity insulation works well | A double wall with a cavity filled with insulating material effectively dampens sound between rooms. |
| Test and optimize | Check the insulation with measuring equipment and improve where you still find leakage. |
| Structure before acoustics | Tackle structural insulation first; acoustic panels don’t really make sound beautiful until after that. |
Supplies and preparation
After the need is clear, here is a complete overview of what you need and where to start. Good preparation saves time, money and frustration later. Make sure you have everything together before you begin.
Essential materials
For effective insulation, you need the following materials:
- Insulation material (rock wool, glass wool or acoustic foam for walls and ceiling)
- Acoustic sealant (for seams, gaps and connections)
- Door strips and draft strips (self-adhesive or screwable)
- Solid rubber sill or automatic sill strip for doors
- Double glazing or secondary glazing for windows
- Vapor barrier film for walls and ceiling
- Plasterboard (when building a false wall)
- Spring mounts such as spring hangers or vibration dampers
Basic tools
- Drill press with various bits
- Stanley knife and straight shear knife
- Tape measure and level
- Silicone applicator (sealant gun)
- Screws, plugs and fastening materials
Preparation steps
Check the construction of your space for weak spots. Doors, windows, vents and electrical outlets are the most common leakage points. Cavity insulation and construction are effective for soundproofing, but only if done correctly without interruptions.
Also check the regulations. Do you live in a rental property or are you a member of a VvE? Then you may need permission for structural alterations. Always check in advance to avoid problems.
When choosing the right materials, an overview of sound-absorbing materials will help you quickly get started.
| Material | Application | Indicative price |
|---|---|---|
| Rock wool (50mm) | Walls, ceiling | €5 to €12 per m² |
| Acoustic foam | Walls, corners | €8 to €25 per m² |
| Sealant | Joints and cracks | €5 to €15 per tube |
| Door strip (rubber) | Door frame | €10 to €40 per door |
| Double glazing | Windows | €80 to €200 per window |
Pro-tip: Buy all the materials at once. Multiple trips to the hardware store not only cost you time, but also lead to color differences or inconsistent products that weaken your insulation.
Home studio insulation step-by-step plan
Now that you know what materials are necessary, here is a clear step-by-step plan. Always work from the outside in: start with the structural shell and then work toward the finishes.
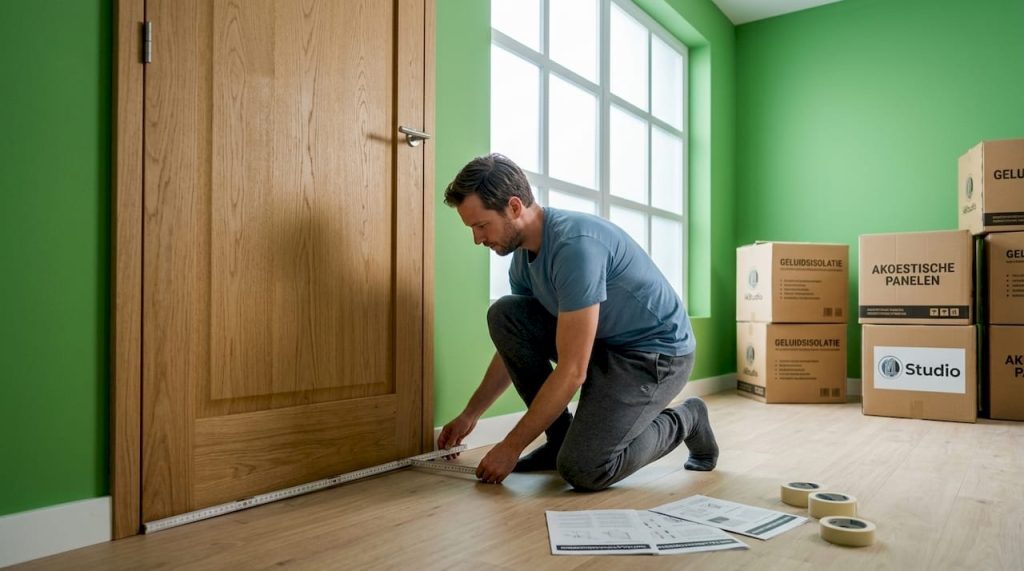
Step 1: Close all leaks
Start by identifying and sealing all small openings. Gaps around doors and windows, holes for cable feedthroughs and gaps near electrical outlets account for a surprisingly large portion of sound loss. Use acoustic sealant for seams and self-adhesive strips for moving parts.
Step 2: Treat the door
“The weakest link in sound insulation when converting a room into a studio is often the door. Standard interior doors are hollow inside and offer very little resistance to sound.
”
The door is your biggest challenge. Special door solutions are crucial for good insulation. You have three options:
- Weighting existing door with solid plates or special door filling
- Installing acoustic door with integrated seal all around
- Build double door or airlock for maximum attenuation
An airlock, where two doors enclose a small space, is the most effective solution but also requires more space and budget.
Step 3: Tackle the windows
Single-pane glass lets a lot of sound through. Consider secondary glazing: an extra pane of glass that you place in front of the existing window. This is cheaper than complete window replacement and still gives a significant improvement. Again, make sure you have good sealing around the frame.
Step 4: Insulate walls and ceiling
Build a pre-wall at some distance from the existing wall. Fill the cavity with rock wool or glass wool and seal with drywall. Use spring-loaded profiles so that the wall is not in direct contact with the structure. This prevents the transmission of vibrations through the building structure, also known as impact sound or structure-borne noise.

The same principle applies to the ceiling. Use spring hangers for the support structure so that the new ceiling layer hangs freely from the existing structure. Improve the acoustics in your home studio by paying attention to the sound quality within the room even after insulation.
Step 5: Ventilation and cable entries
Ventilation is a common leakage point. Sound travels effortlessly through pipes and ducts. Use a sound-absorbing ventilation box or make a sound-absorbing duct with bends and absorption material on the inside. Seal cable penetrations with acoustic sealant after installing the cables.
Step 6: Floor and vibration damping
Structural noise through the floor is a separate category. Lay a floating floor with a vibration damper as an intermediate layer. This is especially relevant if you play drums or bass, or if your neighbors live below you. Understand why audio isolation is crucial to your final studio quality.

Pro-tip: After each step, check the result with a decibel meter app. That way you’ll know exactly where there are still gains to be made before moving on to the next layer.
Different insulation approaches compared
Now that the basic approach is clear, this comparison will help you make the best choice for your space. Each method has its own pros and cons, depending on your budget, space and desired insulation value.
Statistics: Up to 50% of the sound loss in a poorly insulated room occurs through structural weaknesses such as doors, windows and connections. That means you can solve half the problem already with structural modifications.
| Method | Insulation Value | Cost | Space loss | Suitable for |
|---|---|---|---|---|
| Pre-wall | High | Medium | 8 to 15 cm | Permanent studio |
| Cavity wall with filling | High | Medium to high | Existing cavity | New construction or renovation |
| Solid wall (extra low) | Medium | Low to medium | 3 to 5 cm | Limited space |
| Acoustic door + strips | Medium | Medium | Minimum | Any situation |
| Airlock (double door) | Very High | High | 1 to 2 m² | Professional setup |
Cavity structures offer double-wall damping and are often filled with insulation material for additional soundproofing. This is one of the most effective methods, but requires an existing cavity or that you have room to create one.
The pre-wall is the best choice for most home studios. You build it away from the existing wall, fill the cavity with rock wool and mount the drywall on spring-loaded profiles. The result is a floating structure that blocks sound as well as vibration. Also improve the acoustic quality of your space after the insulation is in place.
Practical tips by method:
- Pre-wall: Use at least two layers of drywall with a shifted seam pattern for better damping.
- Cavity wall: Make sure the cavity is completely filled with no air gaps; gaps greatly reduce effectiveness.
- Solid additional layer: Combine with acoustic sealant along all edges for maximum results.
- Acoustic door: Check the threshold strip carefully; even a small gap at the bottom of the door lets significant sound through.
Testing and optimization of insulation
Once the right approach is chosen, you want to know if everything works as intended. Testing is not an optional step; it is a requirement.
How to test
- Decibel meter app (such as Decibel X or NIOSH SLM): free and sufficiently accurate for an initial measurement
- Professional sound meter: more accurate and also measures frequency range
- Listening method: have someone in the studio play music while you listen outside
Always measure in several places: next to the door, at the window, along the wall and at vents. Record the values before and after each adjustment.
What you pay attention to
- Doors and frames: walk the perimeter and feel if you feel air flowing
- Windows: check that the frame is completely sealed
- Vents: measure separately here, as these are often a major leakage point
- Sockets and switch boxes: sound can leak through these as well
- Wall/ceiling/floor connections: seams are treacherous
After insulating, check the weak links, especially doors and cavity formation, to confirm that your insulation is effective.
Solutions in case of insufficient results
If the measurement is disappointing, these are your options:
- Add an additional layer of drywall to the stud wall
- Replace the door with a heavier model or add an airlock
- Check and re-glue all seams and connections
- Install a soundproof ventilation box if ventilation is the problem
More practical advice for recording at home can be found at home studio recording tips.
Our experience with home studio isolation: what you won’t read in other guides
After the steps and tests, here is an honest perspective from real life. Because there are a few things you don’t read about in most guides, but which we encounter time and again.
The biggest misunderstanding: insulation versus acoustics. Many manufacturers start by hanging acoustic panels and think that solves the problem. It doesn’t. Acoustic panels improve the sound within the room by dampening reflections. Sound insulation prevents sound from traveling between rooms. They are two completely different problems with completely different solutions.
A perfectly insulated room can still sound bad if the acoustics aren’t right. And a room full of acoustic panels still leaks sound if the door is not sound. So always start with the structural insulation, then the acoustic treatment.
Never skimp on sealing. Small gaps and unsealed seams account for a disproportionate amount of sound loss. A gap as small as 1 centimeter under a door can cut the effectiveness of the entire insulation in half. Sealant and door strips are inexpensive. Use them generously.
Don’t start with expensive panels. We regularly see home studio owners spending hundreds of dollars on acoustical wall panels when their door is still a standard hollow interior door. That money is better spent on a solid door, good strips and an extra layer of drywall. Structural improvements are always more effective than decorative solutions.
Pro-tip: Invest in custom work if you really want to get the most out of your space. Standard solutions work to a point, but a custom-built airlock or specifically designed pre-wall gives results you won’t achieve with off-the-shelf products.
The best home studio acoustics products will help you move forward once the building foundation is in place.
Getting started yourself? These products make a difference
Ready to further optimize your studio? Then it’s important to start with the right materials and gear that really get results.

At i4studio you will find a complete range for the serious home producer. From studio gear for beginners to high-quality acoustic diffusers that instantly improve the sound quality in your space. And if you also want to optimize your studio PC for music production, check out the overview of studio PC components for a setup that supports your workflow. All in one place, tailored to the needs of the Dutch music producer.
Frequently Asked Questions
How do I prevent sound from leaking through my door?
Use a special acoustic door, a double door or add an airlock. This will prevent most of the sound that would otherwise leak out through the weakest link in your insulation.
What is the difference between soundproofing and acoustic treatment?
Sound insulation limits sound transmission between rooms. Acoustic treatment optimizes reflections and reverberation within the studio itself. Both are necessary, but address them in the right order.
Is cavity wall insulation suitable for a home studio?
Yes, a cavity wall with insulation provides effective damping, especially if the cavity is completely filled with suitable material such as rock wool or glass wool.
How can I test the effect of my insulation?
Use a decibel meter (app or device) and measure both inside and outside the room, paying extra attention to doors, windows and vents.
Should I always seek professional help?
For most home studios, self-construction will suffice just fine. Professional help is needed only for complex structural modifications or if you are aiming for a very high level of insulation.


