For most applications, there is a minimum guideline for the thickness of acoustic panels required for effective absorption. Thin panels measuring 2–3 cm work reasonably well for high frequencies and speech intelligibility, but fall short when it comes to addressing mid-frequencies. For bass control, you need panels that are 10 cm or thicker, preferably installed in corners. These are the three key levels that matter most.
Rules of thumb by application:
- Office and meeting room: 2–5 cm of polyester or foam is sufficient for speech frequencies and reverberation reduction.
- Home studio and recording space: Start with mineral wool panels of a thickness suitable for effective absorption at the first reflection points; add thicker corner solutions later.
- Control room and mixing room: a thickness suitable for effective absorption on the walls and ceiling, with thicker panels for bass traps in the corners.
- Home theater: a thickness suitable for effective sound absorption on side and rear walls; thicker panels in the corners for a tighter low-frequency response.
- Classroom: A thickness suitable for sound absorption, using polyester or glass wool on the walls and ceiling, is generally sufficient.
Pro-tip: Not sure what thickness you need? Start with 5 cm of mineral wool at the first reflection points. That will already give you a clearly audible result and allow you to expand in phases by treating the corners.
Key insights
The thickness of acoustic panels determines which frequencies are absorbed: 5 cm is the minimum starting point for most applications, while 10 cm or more is necessary for effective bass control in corners.
| Item | Details |
|---|---|
| Minimum Thickness for Studios | Start with 5–10 cm of mineral wool at reflection points for effective mid-frequency absorption. |
| Bass control requires more | Use 10–20 cm in corners for low frequencies; flat 5 cm wall panels are insufficient here. |
| Air Cavity Improves Performance | A 5–10 cm cavity behind a panel improves low-frequency absorption without adding extra thickness. |
| Office and Speech | 2.5–5 cm of polyester or foam is sufficient for speech frequencies above 500 Hz. |
| I4studio Recommendation | The Artic Mini Acoustic Panel and the Square Acoustic Foam Panel are suitable as a starting point for each application. |
Table of contents
- Why does thickness determine which frequencies a panel absorbs?
- What materials are available, and which thicknesses work best?
- What thickness do you recommend for each room and application?
- Bass Traps and Corner Solutions: When Do You Need a Lot of Thickness?
- How does the distance from the wall affect performance?
- Do-it-yourself or ready-made: What’s the cost, and which works better?
- Checklist: How do you determine the right thickness when making a purchase?
- Our Experience with Panel Thicknesses at I4studio
- Order Acoustic Panels Through I4studio
- Sources
- Frequently Asked Questions
Why does the thickness determine which frequencies a panel absorbs?
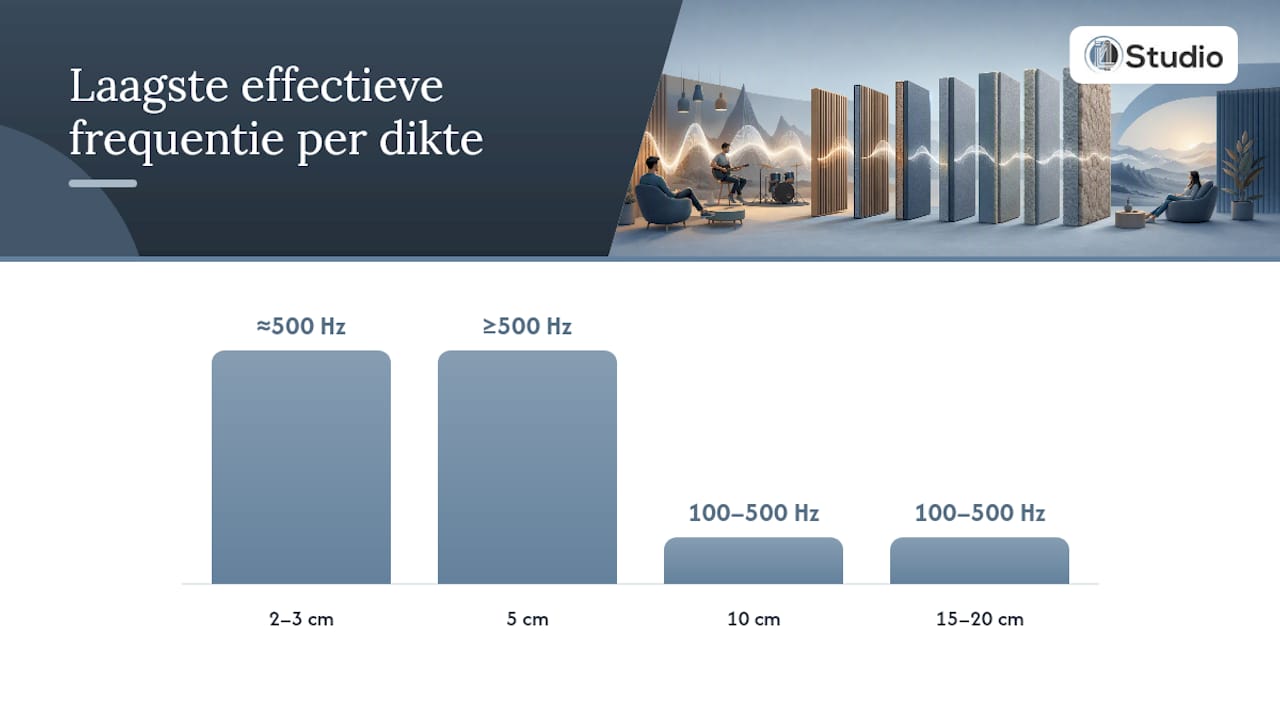
Thicker panels shift the absorption to lower frequencies. Thin panels work well above about 500 Hz, but at lower frequencies, the wavelength is so long that a thin material can barely absorb it. The absorbing mass must be large enough to slow down the sound wave and convert it into heat.
Simply put: the lower the frequency, the longer the wavelength, and the more material thickness you need to block that wave. A 2.5-cm panel absorbs the high frequencies but allows the bass to pass through virtually undisturbed. Broadband absorption, which addresses both high and low frequencies, therefore requires either a thicker panel or a combination of thickness and an air gap.
| Frequency Range | Effective frequency range | Typical application |
|---|---|---|
| 2–3 cm | Above approximately 500 Hz | Speech, high frequencies, office |
| 5 cm | 500 Hz and higher (mid frequencies) | Home studio, reflection points |
| 10 cm | 100–500 Hz and, in some cases, lower | Control room, home theater |
| 15–20 cm | 100–500 Hz (bass) | Subwoofer enclosures, corner solutions |
Acoustic data shows that mineral wool absorbs sound across a wider range than foam and is more effective at lower frequencies. Verhelst adds that the optimal thickness always depends on both the material and the target frequencies.
Want to quickly check if your treatment is working? Here are three simple methods:
- Clap test: Clap your hands in different spots in the room and listen for echoes.
- Sound Check: Play a familiar reference track and compare the sound in the corners to the center of the room.
- RTA measurement: Use a Real-Time Analyzer (such as the free Spectroid app or a DAW plugin) with a measurement microphone to identify frequency issues.
What materials are available, and which thicknesses work best?
The choice of material also determines what thickness is effective. Mineral wool performs better per millimeter than standard acoustic foam, which means that 5 cm of mineral wool goes further than 5 cm of foam. This has a direct impact on your budget and the amount of space you sacrifice.
- Acoustic foam (PU foam): typically 2–5 cm; density 20–40 kg/m³; works well for high frequencies and speech. Affordable, lightweight, but has limited effectiveness below 500 Hz. Suitable for office use or podcasting.
- Polyester fiber: 2.5–5 cm; density 40–80 kg/m³; safe, dust-free, and suitable for areas where people are present. A good choice for classrooms and offices.
- Glass wool and rock wool (mineral wool): 5–10 cm or more; density 40–100 kg/m³; the best all-around material for studios. Broad-band absorption; can be stacked in corners as a bass trap.
- Melamine foam: 2–5 cm; lightweight with an open-cell structure; provides good absorption in the mid-range but is fragile and more expensive per square meter.
- Wood wool (wood fiberboard): 2.5–5 cm; combines absorption with diffusion; suitable for spaces where aesthetics are also important, such as offices and hospitality venues.
When it comes to fire safety: for professional projects and public spaces, it’s best to choose materials with a fire rating certification (Euroclass B or C). Mineral wool generally performs better in this regard than standard PU foam. Always use a breathable covering so that sound can actually reach the material. An impermeable fabric or film completely blocks sound absorption.
Costs vary widely: foam and polyester are the least expensive options, while mineral wool falls in the mid-range but offers better performance per euro at lower frequencies. Ready-to-install systems with integrated absorption and diffusion, such as acoustically tested office panels, are more expensive but offer guaranteed performance for speech-intensive environments. You can find more background information on materials in the I4studio guide to effective acoustic panels.
What thickness do you recommend for each room and application?
Experts at Wisseloord recommend that small studios start with 5–10 cm panels at reflection points and then add thicker bass traps (10–20 cm) in the corners. That is also the approach that I4studio routinely recommends.
| Space | Recommended thickness | Target frequencies | Installation |
|---|---|---|---|
| Home Studio | 5–10 cm | 100–500 Hz | First reflection points, side walls |
| Control room | 5–10 cm walls, 10–20 cm corners | 100–500 Hz | Walls, ceiling, corners |
| Office | 2.5–5 cm | 500 Hz and higher (speech) | Walls, ceiling |
| Home Theater | 5 cm walls, 10+ cm corners | 80 Hz and higher | Side and rear walls, corners |
| Classroom | 2.5–5 cm | 500 Hz and higher | Walls and ceiling combined |
Divide your treatment into two steps. Start with the first reflection points: the side walls at the level of your listening position, the ceiling above them, and the rear wall. That alone will provide a noticeable improvement. Only then should you add corner treatment for bass control. Those who try to do everything at once often end up spending too much money on the wrong areas.
Budget options: A DIY solution using rock wool (Rockwool or Isover, 5–10 cm) in a wooden frame with breathable fabric costs roughly €15–30 per panel in material costs. Ready-made panels start at around €30–80 each for entry-level models. Airsealis confirms that at least 5 cm of material provides noticeable noise reduction, with additional thickness required for lower frequencies.
Bass Traps and Corner Solutions: When Do You Need a Lot of Thickness?
Bass issues require panels that are 10 cm or longer, preferably placed in the corners of the room. That’s the rule of thumb. Corners are the places where low-frequency energy accumulates most strongly, because sound waves converge from multiple directions. A 5-cm panel on a flat wall has virtually no effect there.
Corner placement is more effective than flat wall mounting for bass, because you capture a larger portion of the accumulated energy with the same amount of material. If you stack two 10-cm panels in a corner, you’re essentially creating a bass reflex port 20 cm deep, with the air cavity behind the material as an added bonus.
- Use thick mineral wool panels (10–20 cm) in vertical corners from floor to ceiling.
- Be sure to treat the horizontal corners (where the wall meets the ceiling) as well for more complete bass control.
- Passive bass traps work best when they cover the entire height of the corner.
- Stacking several thin panels at an angle produces a result similar to that of a single thick panel, provided there is no air gap between the panels.
Pro-tip: Want to know if you have a bass problem? Play a sine wave at 80–120 Hz and walk around the room. Wherever the sound suddenly gets much louder or softer, there’s a standing wave. That’s exactly where your corner treatment will be most effective.
How does the distance from the wall affect performance?
An air gap of 5–10 cm behind a panel noticeably increases low-frequency absorption. That’s the first thing you need to know when installing it. A panel mounted directly against the wall absorbs sound primarily in the higher frequency range. If you hang the same panel 5–10 cm away from the wall, the effective absorption frequency shifts downward without requiring a thicker panel.
For acoustic wall linings, a minimum cavity width is recommended to favorably influence the mass-spring-mass resonant frequency. The same principle applies to freestanding absorbers.
Steps for proper installation:
- Measure the wall and mark the mounting points using a level.
- Use wooden slats or metal spacers to create the desired gap (5–10 cm).
- Secure the panel using appropriate anchors and screws that can support the weight of the material.
- Check to see if the panel’s covering is breathable (hold it in front of a fan: if you feel a breeze, it’s fine).
- After installation, test the system using a clap test or RTA measurement.
Pro-tip: In practice, a 7–8 cm cavity behind a 5 cm mineral wool panel provides a similar low-frequency result as a 10 cm panel installed directly on the wall. That saves both space and money. You can find more assembly instructions in the I4studio installation guide.
Do-it-yourself or ready-made: what does it cost, and which works better?
DIY can yield technically comparable results if you use the right materials and the covering is breathable. That’s the honest conclusion. The difference lies in aesthetics, fire certification, and warranty—not necessarily in acoustic performance.
| Option | Material costs per panel (60×120 cm) | Thickness | Fire rating | Warranty |
|---|---|---|---|---|
| DIY rock wool + frame | €15–30 | 5–10 cm | Depending on the material | None |
| Ready-to-use starter kit | €30–80 | 2.5–5 cm | Often not certified | Limited |
| Professional, ready-to-use | €30–80 | 5–10 cm | Euroclass B/C available | Yes |
When should you choose a ready-made option? For projects that require a fire safety certificate (schools, offices, public spaces), where there are high aesthetic standards, or when you don’t have time for construction. DIY is fine for home studios and hobby rooms, but for professional installations, you want the assurance of a certified product.
Safety note: Do not use dense decorative fabric for DIY panels. Choose an acoustically transparent fabric such as Guilford or France, or similar open-weave fabrics. Also, make sure the frame is sturdy enough to support the weight of mineral wool, which is heavier than foam.
Checklist: How do you determine the right thickness when making a purchase?
Five steps to follow before placing your order:
- Measure the room: record the dimensions (length, width, height) and calculate the reverberation time using a free app or RTA tool.
- Determine the target frequencies: speech environment? Then 500 Hz and higher. Studio or cinema? Then include 100–500 Hz as well.
- Select material and thickness: mineral wool, 5–10 cm, for studios; polyester or foam, 2.5–5 cm, for offices and speech.
- Decide on the installation method: directly on the wall or with an air gap? Wall, ceiling, or corner?
- Post-placement test: clap test, listening check, or RTA measurement to confirm that the treatment is working.
Questions to ask your supplier:
- What is the density of the core material (kg/m³)?
- What is the panel’s fire rating (Euroclass)?
- What is the delivery time, and are there any assembly options or mounting hardware included?
- Are absorption coefficients available (NRC or αw value)?
- What are the standard dimensions, and what is the cost for custom work?
Start the first phase by installing panels for the initial reflection points: two side walls and the ceiling above the listening position. This usually involves four to six panels measuring 60×120 cm or a similar size.
Our Experience with Panel Thicknesses at I4studio
At I4studio, we generally recommend 5 cm as a starting point for reflection panels and 10–15 cm for corner treatment. This applies to home studios, small recording spaces, and home theaters. We only recommend thicknesses thinner than 5 cm for office environments where speech intelligibility is the sole objective.
A common scenario: a producer with a room of about 15 m² installs four 5-cm panels on the side walls and two on the ceiling. The result is a noticeably shorter reverberation time and fewer comb-filter effects during mixing. He then adds two 10-cm corner panels, after which the bass sounds considerably tighter. That’s the phased approach that consistently works.
For compact spaces or as a first step, the I4studio Mini Acoustic Panel Artic is a practical choice. It’s suitable for reflection points in smaller spaces and works well for speech and mid-range frequencies. If you’re looking for an entry-level foam absorption solution, check out the I4studio Square Acoustic Foam Panel: compact, lightweight, and ideal for office and podcast environments where high frequencies are a priority. Not sure which thickness or product is right for your space? Request a consultation through I4studio.
Order Acoustic Panels Through I4studio

I4studio supplies acoustic panels for home studios, control rooms, and offices, offering detailed specifications and honest advice on the thickness you need. We’re not just another generic online store—we’re specialists who know what works in a recording space.
For reflection points and smaller spaces, the Artic Mini Acoustic Panel is the recommended choice: compact, effective for mid and high frequencies, and ready for immediate installation. For foam absorption in office or podcasting environments, the Square Acoustic Foam Panel offers an affordable entry-level option. Looking for a complete overview of the best acoustic products for your home studio? Check out the top 4 acoustic products for a home studio for a curated selection. Order directly from the product page or contact us for personalized advice on thickness, placement, and budget.
Sources
The technical recommendations in this article are based on the following sources:
- What Are the Best Acoustic Treatments for Small Studios? – Wisseloord
- Acoustics Info
- Acoustic Panels: Do They Really Dampen Sound? │ Verhelst
- Caimi Giotto – Acoustic Panels with LED Option
- How thick should insulation be for soundproofing? – Airsealis
Frequently Asked Questions
What is the minimum thickness for an acoustic panel?
For most applications, 5 cm is considered the minimum guideline. Thinner than 5 cm is only effective for high frequencies and speech, such as in an office or podcasting environment.
How thick is an acoustic panel designed for bass control?
For effective bass absorption, you need 10–20 cm, preferably placed in the corners of the room where low-frequency energy accumulates.
What is the thickness of an acoustic false wall?
An acoustic wall lining typically requires a minimum cavity width of approximately 6.5 cm to positively influence the resonance frequency and achieve better insulation.
How thick are sound-insulating walls compared to sound absorbers?
Sound-insulating walls are structurally different and function differently from acoustic absorbers. A cavity wall starts at approximately 6.5 cm in total thickness, while absorbers for studios start at 5 cm and go up to 20 cm for bass traps.
What thickness does I4studio recommend for home studios?
I4studio generally recommends 5–10 cm for reflection panels and 10–15 cm for corner treatment in home studios, starting with the first reflection points on the side walls and ceiling.
Recommendation
- Transform Your Space with Acoustic Wall Panels: Tips and Trends for a Soundproof Oasis – https://i4studio.nl/
- Acoustic Panels For Studio: Complete Guide For Optimal Recording And Mixing Spaces – https://i4studio.nl/
- Acoustic Panels Tips: Practical Guide For Optimal Studio Acoustics – https://i4studio.nl/