You’ve finally decided to get serious about music production, but where do you start? Many producers and musicians struggle with choosing the right studio equipment. Missing essential gear can cause creative roadblocks and completely disrupt your workflow. This guide provides an organized checklist that will help you know exactly what you need to set up a complete, professional music studio that maximizes your creativity and productivity.
Table of contents
- Key points
- Important equipment for your music studio
- Equipment checklist and optimal studio setup
- Improve acoustics and computer for optimal performance
- Common mistakes and helpful tips on studio equipment
- Discover high-quality studio sets and equipment at i4studio
- Frequently Asked Questions
Key Insights
| Item | Details |
|---|---|
| Essential basic equipment | Start with essential basic equipment such as an audio interface and studio monitors to build a reliable sound chain. |
| Audio interface and monitors first | First, choose an audio interface with at least two inputs and high-quality preamps, and put monitors at the center of your setup. |
| Acoustic planning and treatment | Plan acoustic treatment before establishing final positions and ensure reflection control and ergonomics. |
| Step-by-step construction checklist | Follow a systematic structure step by step and divide your budget between recording monitoring and acoustics. |
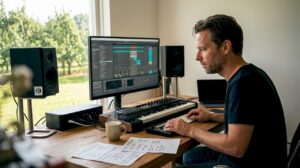
Important equipment for your music studio
The foundation of any professional home studio begins with a selection of core components that make up your creative workspace. A good audio interface is crucial for high sound quality in the studio and acts as the central connection point between your instruments, microphones and computer. These devices include high-quality converters that convert analog signals to digital data and vice versa, directly affecting the transparency of your recordings.
Monitor speakers are essential for reliable audio reproduction during mixing and mastering. Unlike consumer speakers, studio monitors are designed to deliver a flat frequency response, so you hear exactly what’s happening in your mix without coloration. Choose active monitors with built-in amplifiers for the best value for money.

Microphones are the heart of your recording process, and you need different types for different situations. A large-diaphragm condenser microphone is ideal for vocals and acoustic instruments, while dynamic microphones are perfect for drums and guitar amps. Invest in at least one high-quality condenser and one reliable dynamic microphone to stay flexible.
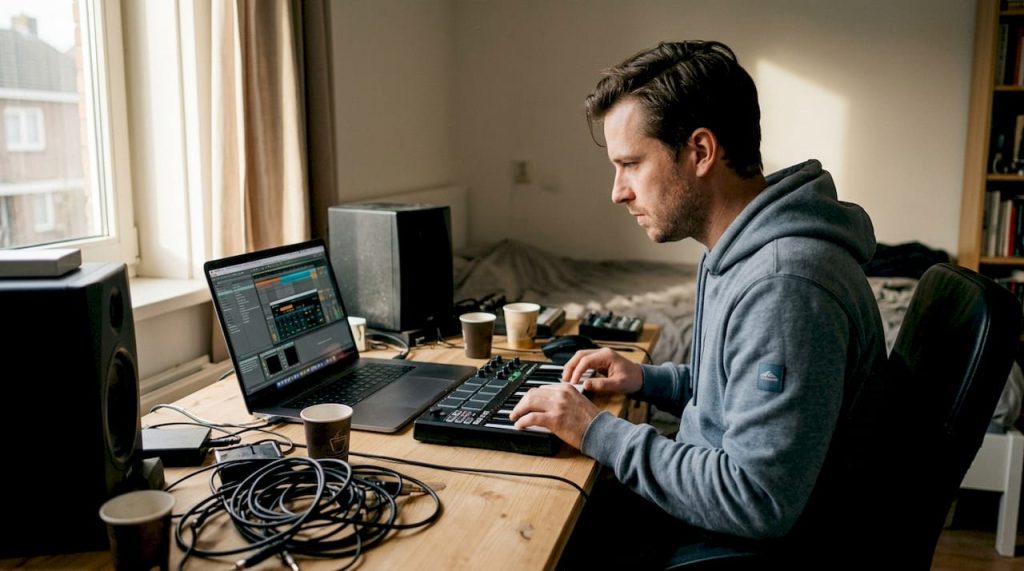
MIDI controllers transform your musical ideas directly into digital notes and parameters within your DAW. These devices range from simple keyboard controllers to fully featured pad controllers with faders and knobs. They significantly speed up your workflow and make it possible to work expressively without a mouse and keyboard.
DAW software is the digital workbench where all your creativity comes together. Popular options such as Ableton Live, Logic Pro and FL Studio each offer unique workflows and capabilities. Choose software that fits your workflow and make sure your computer is powerful enough to run these programs smoothly.
Pro-tip: Start with one high-quality microphone rather than multiple inexpensive options. A versatile condenser microphone will produce better results than three budget alternatives and grow with your skills.
- Audio interface with at least 2 inputs and high-quality preamps
- Active studio monitors in the 5 to 8-inch range
- Large-diaphragm condenser microphone for vocals
- MIDI keyboard controller with at least 49 keys
- DAW software license with regular updates
Equipment checklist and optimal studio setup
A structured approach to purchasing and installing your studio equipment prevents frustration and ensures an efficient workflow from day one. Efficient equipment setup and positioning improves productivity and sound quality by minimizing reflections and optimizing ergonomics. Start by mapping out your available space and measuring exactly where your equipment will be before you purchase anything.
Follow these steps for a systematic construction of your studio:
- Determine your budget and divide it among essential categories such as recording, monitoring and acoustics
- Buy your audio interface and monitors first, as these form the basis of your sound chain
- Add microphones and MIDI controllers based on your specific production needs
- Invest in quality cables and stands to position your equipment safely and ergonomically
- Schedule acoustic treatment before establishing final positions
- Test your complete setup thoroughly and optimize positions for best results
Cable management deserves special attention because messy cables are not only distracting but can also cause interference. Use cable ties and cable trays to route everything neatly. Keep power cables separate from audio signals to avoid hum.
Ergonomic setup means you can reach all the important controls without effort. Place your monitors at ear level in an equilateral triangle with your listening position. Your keyboard and mouse should be within easy reach without stretching.
| Accessory | Recommended location | Function |
|---|---|---|
| Headphone holder | Attaches to desk or rack | Prevents cable breakage and keeps workstation tidy |
| Cable Organizers | Under and behind desk | Minimizes visual clutter and prevents confusion |
| Monitor stands | On desk or floor | Brings speakers to ideal listening height |
| Pop filter | For microphone | Reduces plosive sounds in vocal recordings |
| Shock mount | Microphone stand | Isolates microphone from mechanical vibration |
Pro-tip: Invest in high-quality XLR cables with good shielding for your microphones. Cheap cables can introduce noise that you only hear during mixing, which means costly re-recordings.
Provide adequate space around your equipment for ventilation and maintenance. Audio interfaces and computers produce heat that must be allowed to escape. Plan at least 10 inches of free space on all sides of devices with vents.

Improve acoustics and computer for optimal performance
The best equipment produces substandard results in a poor-sounding room. Good acoustics prevent unwanted reflections and improve recording quality by eliminating standing waves and flutter echoes. Acoustic treatment is not a luxury but a necessity for reliable mixing decisions.
Start by identifying problematic reflection points in your space. Place absorption panels at the first reflection points between your monitors and listening position. These are typically located on the side walls, ceiling and behind your monitors. Use a mirror to find these points: if you can see your monitor in the mirror from your listening position, place a panel there.
Bass traps are essential for controlling low frequencies that accumulate in corners. These thick, porous structures absorb energy from long wavelengths that thin panels simply let through. Place at least one bass trap in each corner behind your listening position for noticeable improvement.
Common acoustical errors will cost you time and money:
- Too much absorption creates a dead, unnatural sound space
- Treating only visible surfaces while ignoring ceiling and floor
- Using cheap alternatives such as egg cartons that do not provide effective absorption
- Ignoring diffusion, providing natural dispersion of sound
Your computer is the digital heart of your studio and must be powerful enough for demanding plugins and large projects. Powerful computer systems ensure stable and fast music production without frustrating delays or crashes during creative sessions.
The key components for audio productivity are a fast processor with at least 6 cores, 16 GB of RAM as an absolute minimum (32 GB is better), and an SSD for your operating system and DAW. Store your project files and sample libraries on a separate SSD for optimal load times. A slow hard drive causes buffer underruns and audio dropouts that disrupt your workflow.
“A powerful computer is the silent hero of any modern music studio. Invest in sufficient processing power and you’ll never again be creatively constrained by technical limits while producing.
”
Make sure your computer is compatible with your chosen DAW and plugins. Mac systems have traditionally been popular for music production, but modern Windows machines with optimized configurations perform just as well. Consider a custom-built studio PC specifically tailored to audio workloads for the best price-performance ratio.
Common mistakes and helpful tips on studio equipment
Even experienced producers sometimes make costly mistakes when expanding their studio. Many beginners invest in unnecessary equipment without prioritizing, leading to wasted budgets and a messy workspace. Learn from these common pitfalls to maximize your investment.
The biggest purchasing mistake is buying too much equipment too soon. You don’t need 20 synthesizers to make professional music. Focus first on mastering what you have before you expand. One well-understood synthesizer produces better results than 10 instruments you barely know.
Prioritizing equipment selection determines the success of your studio:
- Invest the most in your monitor setup, because reliable playback is fundamental
- Choose quality over quantity in microphones and preamps
- Wait with expensive outboard gear until your workflow really calls for specific hardware
- Spend a substantial portion of your budget on acoustic treatment
Maintenance and regular updates keep your equipment in top condition for long-term use. Dust your equipment monthly with a soft brush and keep vents clear. Update your DAW software and plugins regularly for bug fixes and new features, but test updates in a separate environment before applying them to critical projects.
Budget management requires discipline and planning. Create a spreadsheet of desired equipment and prioritize items based on immediate impact on your productivity. Set a realistic schedule for purchases and resist the temptation to buy impulsively during sales. Often those “essential” deals are not at all as beneficial as they seem.
Pro-tip: Rent expensive equipment first before you buy. Many stores and online platforms offer rental services that allow you to test gear in your own studio. This prevents costly mistakes and helps you discover what really suits your workflow.
Quality choice does not always mean choosing the most expensive product. Do thorough research, read professional reviews and seek advice from experienced producers. Some mid-range products outperform flagship models for specific applications. Pay attention to manufacturers’ build quality and customer service, because cheap equipment that breaks down quickly ends up costing more.
Avoid these typical pitfalls:
- Upgrading too quickly without fully utilizing your current gear
- Buy equipment because others use it, not because you need it
- Postpone acoustic treatment while spending thousands on gear
- Failure to consider future expansion opportunities
- Considering cables and accessories as an afterthought when they are crucial
Discover high-quality studio sets and equipment at i4studio
Now that you know exactly what equipment is essential for a complete music studio, the next step is to find reliable sources that combine quality and expertise. i4studio offers professional studio sets and recording bundles specifically put together for producers who want to get started right away without worrying about compatibility.

As a specialist in custom-built studio PCs and acoustic solutions, i4studio understands exactly what musicians and producers struggle with. Their comprehensive guides to studio equipment buying help you make conscious choices that fit your budget and production needs. Whether you’re setting up your first home recording studio or looking to upgrade your existing setup, you’ll find everything you need to work professionally.
Frequently Asked Questions
What is the most essential equipment for a home studio?
An audio interface, monitor speakers and a decent microphone are the absolute foundation for any home studio. These three components make recording, editing and reliable playback possible. DAW software completes this core setup and transforms your computer into a complete recording studio.
How do I improve the acoustics in my music studio?
Start by placing absorption panels at the first reflection points between your monitors and listening position. Add bass absorbers in the corners of your room to control low frequencies. Professional acoustic treatment makes the difference between guessing and knowing while mixing.
Which computer is suitable for music production?
A modern computer with at least a 6-core processor, 16 GB of RAM and SSD storage is a solid foundation for music production. Ensure compatibility with your chosen DAW software and consider 32 GB of RAM for large projects with many plugins. Specialized studio computers are optimized for stable, low-latency audio performance.
How much should I invest in my first studio setup?
A usable beginner setup costs between $1500 and $3000, including audio interface, monitors, microphone, MIDI controller and software. Reserve 20 percent of your budget for cables, stands and acoustic treatment. Quality in your monitor setup takes priority over quantity of gear.
Can I make professional music with budget equipment?
Yes, modern budget equipment offers surprisingly good quality if you set priorities right. Invest most in your audio interface and monitors, because they determine what you hear. Cheaper microphones and controllers are acceptable for beginners. Your skills and knowledge are more important than expensive gear for professional results.
Recommendation
- Practical Home Studio Setup Ideas For Musicians And Producers – https://i4studio.nl/
- Home Studio Setup Tips: Complete Guide To A Professional Studio At Home – https://i4studio.nl/
- Purchasing Studio Equipment: A Practical Guide For Professionals And Creatives – https://i4studio.nl/
- Computer for Music Production: Complete Guide to Studio Performance – https://i4studio.nl/