Briefly:
- Noise in a studio is caused by electromagnetic interference, poor cable routing, and inadequate insulation.
- Minimizing noise requires high-quality equipment, proper cable routing, and effective sound insulation.
Noise in a studio is any unwanted sound that contaminates your recording, from a faint hum in the cable to traffic outside. How do you minimize noise in the studio? By addressing three key areas: high-quality equipment with a low noise floor, proper cable routing, and effective soundproofing. A professional recording signal chain requires external preamps with a low EIN value, combined with high-quality cables and proper grounding to ensure noise-free sound. Skip any one of these three layers, and you’ll pay the price in every recording you make afterward.
How can you minimize noise in the studio using equipment and cabling?
The noise floor of your recording starts with your preamp. A high-quality studio preamp with an Equivalent Input Noise of -128 dBu or lower guarantees minimal inherent noise at high gain. That number may sound abstract, but in practical terms it means: even at maximum gain, you won’t hear any background noise in your recording.

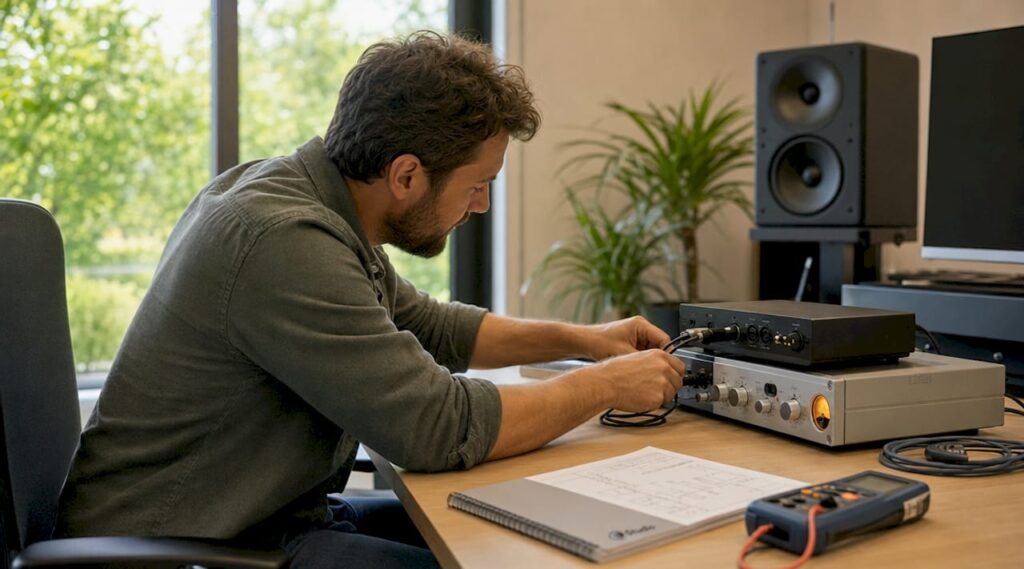
In addition to the preamp, your choice of cable determines how much electromagnetic interference your signal picks up. Balanced XLR cables use common-mode rejection to eliminate unwanted noise. They are essential for professional recordings, especially in a room with multiple power cables and devices.
Which settings and cable configurations reduce noise immediately?
Good equipment only works if you install it correctly. Follow these guidelines:
- Gain staging: Set your preamp so that the signal is strong enough without requiring digital amplification later on. Digital amplification also increases the noise level.
- Keep cables separate: Run audio and power cables at least 10–15 cm apart. If they do cross, make sure they do so at a 90-degree angle to minimize inductive interference.
- Test procedure: Connect your preamp without a microphone or instrument and listen to the output. Do you hear a hum or noise? If so, the problem lies with the power supply or grounding, not with your microphone.
- USB hubs: Use isolated USB hubs for your audio interface. Standard USB hubs can sometimes introduce digital noise through the power line.
- Surge protection: A power strip with a ground connection and surge protection effectively prevents electrical interference in a studio setup.
Pro-tip: Temporarily turn off your computer monitor, Wi-Fi router, and fluorescent lights during a test recording. This will help you quickly identify which device is causing the noise, without having to replace everything right away.
Choosing the right power source is just as important as choosing your microphone. Many producers invest hundreds of dollars in a condenser microphone and forget that a poor power supply can undo all their hard work.
How does soundproofing work to block out background noise?
Sound insulation and acoustic treatment are two different things. Insulation blocks outside noise. Acoustic treatment corrects the sound within the room. You need both for a quiet recording.
The mass-spring-mass principle is the foundation of true sound insulation. You combine a heavy mass, such as drywall or concrete, with a decoupled air cavity filled with mineral wool. This combination prevents sound vibrations from being transmitted from one wall to the other. A single thick wall is less effective than two lighter walls with a cavity between them.
Step-by-step soundproofing for your studio
Follow these steps for best results:
- Seal gaps: Start by installing weatherstripping and cellular rubber around doors and windows. Sealing gaps can immediately reduce noise by up to 5 dB. That’s an audible difference in every recording.
- Tackle the doors: attach a door brush to the bottom of your studio door. Sound leaks most easily through the gap under a door.
- Improving windows: secondary glazing—an additional pane of glass installed over your existing window—improves insulation by 8–15 dB. That’s the difference between hearing street noise and not hearing it.
- Insulating walls: Apply the mass-spring-mass principle to the weakest wall. Build a second wall at a distance from the existing wall and fill the cavity with mineral wool.
- Installing acoustic panels: bass traps in the corners absorb low frequencies. Foam panels and diffusers reduce reverberation and flutter echoes. Use products like the Primacoustic London 8 Acoustic Room Kit for a complete treatment of a small room.
- Check for airtightness: walk through the room with a flashlight in the dark. Do you see light coming through a crack? If so, sound is leaking through there too.
Pro-tip: Outlets and cable penetrations are hidden sources of sound leakage. Electrical junction boxes positioned directly opposite each other create an acoustic bridge. They must be offset by at least 30 cm to ensure the insulation remains effective. Always check this before finishing a wall.
Small home improvements, such as draft stoppers and door brushes, are the most cost-effective steps you can take. They are inexpensive and deliver immediate results without the need for major renovations.
What are the most common sources of noise in a studio?
The most common source of noise in a home studio is a ground loop. A ground loop occurs when two devices are connected to different power circuits and form a loop via the audio cable. The result is an audible 50 Hz hum, which is exactly the frequency of the U.S. power grid.
Ground loop isolators break the electrical path but allow the audio signal to pass through. They are small, inexpensive, and solve the problem immediately. To prevent ground loops, it is best to connect all devices to the same circuit.
How do you systematically identify sources of noise?
Use this approach to find the source:
- Step 1: Unplug all devices except your interface and preamp. Do you still hear noise? If so, the problem lies with those two devices or their power supplies.
- Step 2: Reconnect the devices one by one. As soon as the noise returns, you’ve found the culprit.
- Step 3: Replace the cable connected to the suspected device with a different one. Sometimes a faulty cable is the only cause.
- Step 4: Check whether the device is using an unbalanced connection. Unbalanced connections, such as a standard jack cable, pick up much more noise than balanced XLR connections.
- Step 5: Check your light sources. Fluorescent lights and dimmers cause electromagnetic interference that your microphone picks up. Replace them with LED lights without dimmers.
Pro-tip: Always test cables individually. A cable that looks fine on the outside may be broken internally and cause intermittent noise. A simple cable test using a multimeter or cable tester can save you hours of troubleshooting.
Physical separation is the simplest way to prevent this. Keep microphone cables away from power cables, transformers, and computer power supplies. Most noise in home studios isn’t caused by poor-quality equipment, but by poor cable routing.
What steps should you take to create a noise-free studio?
You build a noise-free studio step by step. Start at the signal source and work your way outward. Here is the order that yields the best results:
- Check and upgrade your equipment: choose a preamp with an EIN of -128 dBu or lower. Replace unbalanced connections with balanced XLR cables.
- Use proper cable management: run audio and power cables 10–15 cm apart. If they cross, make sure they do so at a 90-degree angle.
- Eliminate sources of interference: identify ground loops, fluorescent lighting, and unbalanced connections. Resolve them using isolators, LED lighting, and XLR cables.
- Install soundproofing: seal gaps, install secondary glazing, and build a mass-spring-mass structure where necessary.
- Treat the acoustics: install bass traps, foam panels, and diffusers to achieve a dry, controlled sound. Check out I4studio’s guide to studio soundproofing for a complete overview.
- Use digital noise reduction as a final step: plugins like iZotope RX are powerful, but they are no substitute for a clean recording. Use them only for any remaining noise after you’ve taken all physical measures.
Overview: Tools and Measures for Noise Reduction
| Measure | Tool | Effect |
|---|---|---|
| Sealing gaps | Draft strips, cellular rubber | Up to 5 dB improvement |
| Upgrade your windows | Secondary glazing | 8–15 dB improvement |
| Cable separation | Cable ties, cable trays | Less inductive interference |
| Fixing a ground loop | Ground loop isolator | 50 Hz hum disappears |
| Acoustic treatment | Bass traps, foam panels, diffusers | Less reverberation and flutter echo |
| Protecting the power supply | Power strip with surge protection | Fewer electrical malfunctions |
| Upgrading the preamp | External preamp, EIN ≤ -128 dBu | Lower noise floor |

Digital noise reduction via software is the final step, not the first. If you start with plugins without addressing the physical issues, you’ll spend hours fixing recordings that should never have been made in the first place.
Key insights
The most effective way to minimize noise in a studio is to treat equipment selection, cable routing, and soundproofing as a single system, rather than as separate issues.
| Item | Details |
|---|---|
| Preamp with low EIN | Choose a preamp with an EIN of -128 dBu or lower for a low noise floor. |
| Balanced XLR cables | Common-mode rejection in XLR cables effectively eliminates electromagnetic interference. |
| Sealing gaps pays off right away | Draft strips and cellular rubber provide up to 5 dB of improved insulation without major renovations. |
| Addressing Ground Loops | Use ground loop isolators and connect devices to the same circuit. |
| Mass-spring-mass principle | Two decoupled walls with mineral wool block sound better than a single thick wall. |
What I learned from years of fighting noise in studios
My honest observation after years of working with studio setups: most noise issues aren’t caused by the equipment, but by the setup. I’ve seen producers spend thousands of euros on microphones and preamps, while their power cables were draped right across their audio cables. The result was a recording full of hum that no plugin could fix.
The biggest pitfall is starting with digital noise reduction. iZotope RX is an excellent tool, but it’s just a band-aid for a problem you’d be better off preventing in the first place. Every time you use a plugin to remove noise, you also lose some of your original signal. A clean recording always sounds better than a repaired one.
Another thing I often see: people investing in expensive acoustic panels when their studio door doesn’t even have a weatherstrip. Sound leaks through the easiest route. Seal the gaps first, then tackle the walls. That order will save you a lot of money and frustration.
For those just starting out: invest first in a good preamp and balanced cables. That will give you the most bang for your buck. Then tackle the insulation, starting with the door and windows. Major structural modifications, such as a mass-spring-mass wall, only make sense once you’ve already sealed the small leaks.
Brands like Primacoustic and sE Electronics offer reliable products at a fair price. You don’t have to buy the most expensive equipment to achieve professional results. But you do need to follow the right steps.
– harold
Set up your studio with the right gear from I4studio
A noise-free studio starts with the right basic equipment. Without a good preamp, balanced cables, and acoustic panels, you won’t be able to solve any noise issues at their root.

I4studio provides everything you need to build your studio step by step. From acoustic wall panels like the Mini Acoustic Panel Artic to complete recording bundles like the sE Electronics X1 S Studio Bundle. Not sure exactly what you need yet? Check out the overview of essential studio gear for beginners and discover which investment makes the biggest difference for your situation.
Frequently Asked Questions
What is the noise floor, and why is it important?
The noise floor is the level of background silence in your recording system. The lower the noise floor, the more dynamic range and detail you can capture in your recordings.
What input level does a good preamp require?
A good studio preamp has an EIN of -128 dBu or lower. This ensures minimal inherent noise, even at high gain settings.
How many decibels of noise reduction does sealing gaps provide?
Sealing gaps with weatherstripping or cellular rubber immediately improves insulation by up to 5 dB. Secondary glazing adds another 8–15 dB to that.
What is a ground loop, and how do I fix it?
A ground loop is an electrical loop between two devices connected to different power circuits, which manifests as a 50 Hz hum. A ground loop isolator breaks the electrical path and resolves the problem immediately.
Should I insulate first or apply acoustic treatment first?
Always start with insulation: seal cracks and improve windows and doors. Acoustic treatment with panels and bass traps comes next, because that corrects the sound inside the room, not the sound coming from outside.