Set all individual tracks in your DAW to approximately −18 dBFS RMS and make sure each plugin’s output matches its input. That’s the essence of gain staging, and it’s the fastest way to preserve headroom, avoid noise, and ensure consistent plugin behavior. iZotope confirms that using −18 dBFS as a reference point greatly improves the predictability of plugins.
−18 dBFS RMS is the most commonly cited operating level for individual DAW tracks. Peaks may reach up to −6 or −3 dBFS for transients, but keep the average level within this range.
Do you have a synth or drum preset that comes in too loud right away? Place a gain or trim plugin as the first insert on that track and bring the level back down to −18 dBFS, before any other processing. This way, you can fix the problem at the source without affecting the faders.
Pro tip: Use your DAW’s clip gain or region gain to trim audio clips yourself before they reach the plugin chain. This is cleaner than pulling down a fader, since the fader is meant for mix balance, not input levels.
Four actions you can take right now:
- Set all channel faders to unity (0 dB) before you start mixing.
- Use clip gain or a first-insert gain plugin to bring each track to around −18 dBFS RMS.
- Check the output of your virtual instruments and turn them down if they’re too loud.
- Keep the master bus free of clipping: aim for peak levels well below the digital headroom, heading toward your limiter.
Key insights
Proper gain staging in your DAW starts at −18 dBFS RMS on individual tracks and requires that you match the output of each plugin to the input, so that the plugins respond consistently and the master maintains sufficient headroom.
| Item | Details |
|---|---|
| Operating Point −18 dBFS RMS | Set individual tracks to −18 dBFS RMS as the default operating point for predictable plugin response. |
| Gain vs. Fader | Use clip gain or a first-insert gain plugin for input levels; the fader is for mix balance. |
| Plugin Input/Output Matching | Keep the output of each plugin equal to its input to avoid loudness bias and ensure a fair assessment of processing. |
| Master Headroom | Keep peaks on the master pre-limiter below −6 dBFS to ensure sufficient headroom for the limiter and mastering. |
| I4studio Setup | A stable studio PC, a transparent audio interface, and good acoustics form the foundation for reliable gain staging. |
Table of contents
- What Is Gain Staging in a DAW and Why It’s Important
- Analog vs. Floating-Point: What Changes in Your DAW?
- What dBFS levels do you use for tracks, buses, and the master?
- How to Set Initial Settings: Clip Gain, Instruments, and Faders
- How do you manage gain staging throughout the plugin chain?
- How do you preserve headroom on the mix bus and master?
- Why Listening Level Influences Your Gain Staging Decisions
- Hybrid Workflows: How Do You Integrate Analog Hardware with Your DAW?
- Common Mistakes in Gain Staging and How to Fix Them Quickly
- Step by Step: Gain Staging Checklist for Your Next Session
- Which meters and tools help you with gain staging?
- I4studio Tips: DAW Settings and Studio PC Considerations
- Why Strict Gain Staging Discipline Always Pays Off
- I4studio helps you get your studio ready for professional gain staging
- Sources
- Frequently Asked Questions
What Is Gain Staging in a DAW and Why It’s Important
Gain staging is the process of managing the signal level at every stage of your audio chain, from the initial recording to the final export. The goal is for each component—whether it’s a preamp, a plugin, or a bus—to operate within its optimal range: loud enough to rise above the noise floor, but not so loud that unintended clipping or distortion occurs. Wisseloord Studios describes gain staging as level management throughout the chain to prevent noise and unwanted distortion.
A crucial distinction that many producers overlook: gain and fader are not the same thing. Gain determines the input level of a signal, before plugins and processing. The fader controls the mix balance, after processing. If you correct a signal that’s too loud using the fader, you change the balance in the mix but not the level at which the plugins are fed. Those plugins will still be responding to a signal that’s too hot.
Why does this matter for your mixes?
- Headroom: sufficient space above the average level prevents transients from clipping unexpectedly.
- Consistent plugin response: compressors, saturators, and EQs respond differently at various input levels. At −18 dBFS, they behave predictably.
- Easier mastering: A mix with good gain staging already has the right dynamics and requires less correction during the mastering phase.
The typical gain stages in a DAW workflow range from the preamp or clip gain, through plugin inserts on the track, to subgroups or buses, and finally to the master output. At each of these points, you can monitor and adjust the levels.
Analog vs. Floating-Point: What Changes in Your DAW?
Analog recording chains operated with a fixed noise floor and a hard upper limit for clipping. The operating point of 0 VU, which corresponds to +4 dBu in professional equipment, was a compromise between those two limits. Recording too low meant noise; recording too high meant distortion. That forced engineers to work with precision.
Modern DAWs with 32-bit or 64-bit floating-point processing have virtually unlimited internal headroom. Nothing clips within the host, no matter how loud the signal is. That sounds like a free pass to ignore levels, but it isn’t. MusicRadar explains that individual plugins are still level-sensitive, even if the host itself doesn’t clip. An analog emulation designed for −18 dBFS behaves differently at −6 dBFS: more saturation, different compression characteristics, and sometimes unintended distortion.
Practical implication: Floating-point gives you more flexibility during recording, but it doesn’t relieve you of the responsibility to monitor levels throughout the plugin chain.
Pro tip: If you’re working with a hybrid setup where you send DAW signals to analog hardware, calibrate the DAW level of −18 dBFS to 0 VU on your analog gear. If you’re using only software plugins, the DAW-centric levels are sufficient, and you don’t need to use an analog reference.
The golden rule still applies: keep reference levels consistent so that every plugin in the chain receives the signal it was designed for.
What dBFS values do you use for tracks, buses, and the master?
Specific numbers provide a point of reference. Below are the recommended levels for each point in the signal chain, based on widely accepted professional guidelines.
| Signal Point | Recommended Level | Explanation |
|---|---|---|
| Microphone/preamp output | −18 to −12 dBFS peak | Well above the noise floor, with headroom for transients |
| DAW track pre-fader (RMS) | ≈ −18 dBFS RMS | Operating point for consistent plugin response |
| DAW track peak | −6 to −3 dBFS | Headroom for transients without clipping |
| Plug-in input | ≈ −18 dBFS RMS | Corresponding to track operating point |
| Subgroup/bus | −10 to −6 dBFS peak | More headroom for combined signals |
| Master Pre-Limiter | −6 dBFS peak or lower | Sufficient headroom for limiter and mastering |
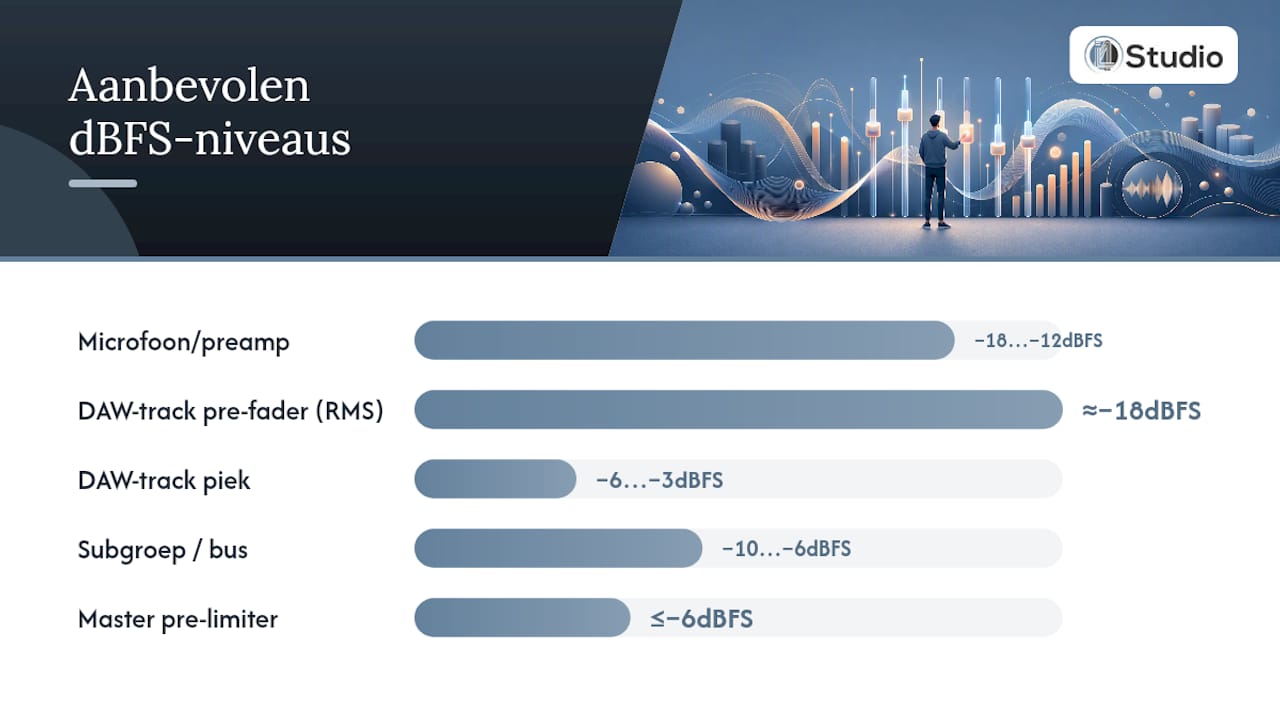
Sound On Sound recommends keeping initial peaks between −12 and −18 dBFS and not letting channel meters exceed −8 to −10 dBFS. Start with faders set to unity or −6 dB for maximum control.
Why −18 dBFS as the operating point? This number isn’t arbitrary: it corresponds to 0 VU in professional analog equipment, where the noise floor is far enough below the signal and there is sufficient headroom left for dynamics. iZotope confirms that this operating point forms the basis for predictable plugin response.
Three rules of thumb to remember:
- Individual tracks: RMS around −18 dBFS, peaks up to −3 dBFS.
- Buses: slightly more headroom than tracks, peaks below −6 dBFS.
- Master: Leave at least −6 dBFS free for your limiter and any mastering processing.
How to Set Initial Settings: Clip Gain, Instruments, and Faders
The most reliable way to set up a session is to work from the source to the output, not the other way around. Start at the source and work your way toward the master.
Step-by-step workflow:
- Set all channel faders to unity (0 dB) before inserting any plugins.
- Measure the RMS level of each track with a meter before the plugin chain (pre-insert).
- Use clip gain or region gain to trim audio clips to an operating level of −18 dBFS RMS.
- For virtual instruments: lower the instrument’s own output or adjust the level with a gain plugin as the first insert on the channel.
- After setting this up, check that peaks do not exceed −3 dBFS.
Sonarworks recommends using clip gain and systematic calibration to ensure consistent results from recording to mixing. Some DAWs, such as Ableton Live, Logic Pro, and Reaper, offer global clip gain tools that allow you to adjust multiple clips at once.
You can solve the problem of “shouty presets” in synths and drum loops by reducing the instrument’s output, not by turning down the fader. A fader set to −10 dB while the plugin chain is receiving a signal of −6 dBFS puts you in a poor starting position for compression and saturation.

When is bouncing useful? If you have a complex instrument rack with a lot of internal routing, it can help to bounce the instrument to audio at the desired level. This gives you a stable, measurable signal as a starting point. Don’t do this if you expect to make a lot of adjustments to the instrument itself.
Pro tip: Use an RMS meter (not a peak meter) to check your operating level. Peak meters show transients but say little about the average level that plugins are actually driving. When recording in your DAW, always choose a meter that displays RMS or LUFS.
How do you manage gain staging throughout the plugin chain?
The principle is simple: a plugin’s output should be roughly equal to its input. If a compressor applies 6 dB of gain reduction, you compensate for that with 6 dB of makeup gain. This ensures the plugin sounds at the same volume with and without bypass, allowing you to accurately assess whether the processing actually improves the sound or simply makes it louder.
Practical techniques for plugin chain management:
- Bypass check: Bypass each plugin individually and compare the volume. If it sounds louder with the bypass enabled, the plugin’s output is too low; if it sounds quieter, the output is too high.
- Meter before the plugin: Place a metering plugin as the first insert to check the input level before processing begins.
- Use makeup gain correctly: Set makeup gain after adjusting the compressor parameters, not before.
- First-insert gain plugin: If the input signal is too hot, add a gain or trim plugin as the very first insert on the channel.
Analog emulations deserve special attention. A tape machine emulation or tube amp plugin is designed for a specific input level. Driving it too hard results in more saturation than intended; driving it too softly results in a thinner sound. Check the plugin’s documentation for the recommended input level.
Pro tip: Do you suspect internal plugin clipping? Place a metering plugin after the suspect plugin and compare it to the meter before it. If the output is significantly higher than the input without you having set any makeup gain, the plugin is clipping internally. Lower the input level using a gain plugin placed before it, without touching any faders.
How do you preserve headroom on the mix bus and master?
The master bus is the final link in the chain, but it’s not the place to fix gain issues that arose earlier in the chain. Still, there are situations where you need to take quick action.
Recommendation for master headroom: Keep peaks on the master pre-limiter below −6 dBFS. This gives your limiter enough headroom to work without the signal already being distorted when it enters. MusicRadar describes the tactic of placing a gain-cut plugin as the first insert on the master as a quick fix when the master is overloading.
What to do if the master gets too hot:
- Add a gain plugin as the first insert on the master bus and lower the level globally so that your master processing works correctly.
- Use subgroup attenuation: lower the level of buses (drums, bass, synths) instead of adjusting individual channels.
- Use a VCA or group approach to lower the levels of multiple channels simultaneously without disrupting their relative balance.
Why the master fader isn’t the right place: Plugins that are placed before the master fader process the signal at the level delivered by the buses. If you turn down the master fader, you lower the output but not the level at which those plugins operate. A limiter on the master will then still receive a signal that’s too loud.
Why Listening Level Influences Your Gain Staging Decisions
Monitoring at too high a volume is one of the most underestimated mistakes in gain staging. Loud monitoring creates a loudness bias: everything sounds better and fuller at high volumes, which makes you inclined to set levels lower than necessary. PureMix recommends working at calibrated reference levels and using a reliable monitor controller for quick volume adjustments.
Ear fatigue occurs after prolonged listening at high volumes. Your ears lose sensitivity to higher frequencies, which can result in mixes that sound too bright or too loud outside the studio.
Practical approach:
- Work at a moderate, calibrated volume. A commonly used reference level for home studios is 79–85 dB SPL at the listening position.
- Use a monitor controller with a dedicated volume knob as your primary loudness adjuster, not the faders in your DAW.
- Take regular 10–15-minute breaks during intensive mixing sessions.
Pro tip: Purposely turn down your monitor volume halfway through a session. If the mix still sounds good and the balance is right, you’ve done a good job with gain staging. If it suddenly sounds thin or unbalanced, you were previously misled by the high volume.
Hybrid Workflows: How Do You Integrate Analog Hardware With Your DAW?
In a hybrid setup, you send DAW signals to external analog hardware, such as a summing mixer, an analog compressor, or a tube preamp. The risk is that DAW levels and analog levels aren’t matched, which can lead to unexpected saturation or a signal that’s too weak in the analog chain.
Two-step calibration process:
- Step 1 — DAW calibration: Ensure that individual tracks are set to −18 dBFS RMS and submixes to −14 dBFS before the signal enters the analog chain.
- Step 2 — Analog output calibration: Send a −18 dBFS test tone from your DAW to the analog hardware and adjust the hardware’s input sensitivity so that the meter reads 0 VU.
Sonarworks describes this two-step approach as the foundation for consistent results in hybrid workflows. When you lower submixes to −14 dBFS before sending them to the analog chain, you provide the analog hardware with sufficient signal level without overloading it.
Practical scenarios:
- Are you routing your drums through an analog bus compressor? Lower the drum subgroup to −14 dBFS for the send so that the compressor operates within its optimal range.
- Are you using an external preamp for re-amping? Calibrate the DAW output to the preamp’s nominal input level, typically +4 dBu or −10 dBV depending on the device.
Common Gain Staging Mistakes and How to Fix Them Quickly
Most gain staging issues boil down to a handful of common mistakes. Here are the most common ones, along with immediate solutions.
- Using the fader as input gain: The fader is set to −15 dB while the plugin chain is receiving a signal that’s too loud. Solution: Use clip gain or a first-insert gain plugin to correct the level at the source, and set the fader back to unity.
- Don’t correct “shouty” presets: a synth or drum plugin is coming in at −3 dBFS or higher. Solution: Lower the instrument’s output level or add a gain plugin as the first insert.
- No metering before plugins: you don’t know what the plugins are receiving. Solution: Place a metering plugin as the first insert on each track and check the RMS level.
- Pushing the master signal back with the master fader: The master fader is set to −6 dB to prevent clipping, but plugins on the master channel are still receiving a signal that’s too loud. Solution: Add a gain-cut plugin as the first insert on the master channel.
- No bypass checks: You can’t tell whether a plugin actually improves the sound or just makes it louder. Solution: Bypass each plugin and compare the volume. Adjust the makeup gain until the bypassed and active versions sound the same.
Step by Step: Gain Staging Checklist for Your Next Session
Use this workflow for every new mixing session. The steps are in order; don’t skip any of them.
- Session Setup (5 minutes): Set all channel faders to unity. Check that there is no active automation affecting the levels.
- Set clip gain (10–15 minutes): Measure the RMS level of each track pre-insert. Use clip gain or region gain to bring tracks down to −18 dBFS RMS.
- Check virtual instruments (5 minutes): Check the output of synths, samplers, and drum plugins. Reduce the level as needed via the instrument output or a first-insert gain plugin.
- Build the plugin chain: Add plugins and check the output with a meter after each plugin. Adjust the makeup gain so that the output ≈ input.
- Perform bypass checks: bypass each plugin individually and compare the volume. Adjust as needed.
- Check bus levels: Measure the peaks on subgroups. Keep peaks below −6 dBFS.
- Check the master headroom: check the master pre-limiter. Peaks must remain below −6 dBFS.
- A/B listening test: Listen at low volume and compare to a reference track. Does the balance still sound good?
- Final headroom check before export: Check the true peak on the master. Do not export until the limiter is working correctly and there is no unintended clipping.
Additional verification steps:
- Check to see if all meters are set to pre-fader or post-fader, depending on what you want to measure.
- Listen at different volume levels to avoid loudness bias.
- Save a session template with the correct fader positions and metering plugins for future projects.
Which meters and tools help you with gain staging?
Having the right meter in the right place makes gain staging much more concrete. MusicProductionWiki recommends using RMS for the working level, peak and true peak for peak monitoring, and LUFS during finalization and export.
Recommended metering plugins:
- Youlean Loudness Meter: free, displays LUFS, true peak, and dynamics. Useful during finalization.
- VU Meter (various free versions): displays RMS-based average level, ideal for setting the working level to −18 dBFS.
- HOFA 4U Meter: professional metering with peak, RMS, and LUFS in a single window.
- Klanghelm VUMT: lightweight VU meter with adjustable calibration, suitable for everyday use.
For hardware: A monitor controller with built-in metering or a separate hardware meter gives you a reference that’s independent of your DAW’s playback. In a home studio, a monitor controller like the Audient ORIA is also useful as a volume adjuster, so you don’t have to use faders to adjust your listening level.
Pro tip: Always place a metering plugin as the first insert on a channel to measure the input level, and as the last insert to check the output. This way, you can see exactly what the plugin chain does to the signal. Pre-fader metering shows what the chain is receiving; post-fader metering shows what the bus is receiving.
I4studio Tips: DAW Settings and Studio PC Considerations
A stable studio PC is a prerequisite for reliable gain staging. Buffer underruns, CPU spikes, and driver instability cause erratic metering and unreliable plugin behavior, which undermine your gain staging decisions. A well-configured audio PC with a low-latency ASIO driver and sufficient RAM (at least 32 GB for larger sessions) provides a stable foundation. Check out the guide on optimizing DAW performance for specific settings.
Recommendations for your setup:
- Audio interface: Choose an interface with a transparent preamp and low noise floor (EIN). An interface like the Audient EVO 16 offers multiple inputs with precise gain control, which immediately improves the first step in your gain staging chain.
- Monitor controller: Use a separate monitor controller as your primary volume adjuster. This prevents you from using faders or plugin makeup gain to adjust your listening level.
- Acoustics: Poor room acoustics can mislead your ears and, consequently, your gain staging decisions. Acoustic panels reduce reflections and give you a more accurate picture of the actual level.
DAW settings that support gain staging:
- Set up a session template with all channel faders set to unity, metering plugins as the first insert on each channel, and a gain plugin ready on the master.
- Set your DAW meter to RMS or LUFS, not just peak.
- Use color-coding for each bus so you can quickly see which groups are getting too loud.
Pro tip: Save your session template with a test tone of −18 dBFS on a reference channel. This way, you can quickly check whether your metering is calibrated correctly at the start of every new session.
A well-configured studio PC with a stable ASIO driver and sufficient processing power ensures that meters respond in real time and plugins perform consistently. Check out I4studio’s DAW setup tips for a complete setup checklist.
Why Strict Gain Staging Discipline Always Pays Off
Gain staging is often seen as a technical formality—something you do simply because it’s “the right thing to do.” But producers who consistently apply it notice something else: their mixes are finished faster, sound more consistent, and require less correction during the mastering phase.
The most underrated benefit isn’t the headroom or the plugin’s response, but the decision-making flexibility it provides. When all the levels are right, you can hear what a plugin is actually doing. You can tell whether a compressor is shaping the dynamics or just making the sound louder. You can tell whether an EQ is enhancing the sound or simply compensating for an overdriven input signal. That distinction is invaluable, especially on commercial projects where every choice must be justifiable.
The pitfall I see most often: producers who put off gain staging until the mix is “almost done,” only to discover that the master is clipping and the plugin chain is behaving inconsistently. Fixing these issues later takes more time than doing it right from the start. Make gain staging part of your standard session setup, not part of your post-production troubleshooting. I4studio offers advice and hardware for anyone who wants to equip their studio with the right tools for a consistent workflow.
I4studio helps you get your studio ready for professional gain staging
A good gain staging workflow starts at the source: a transparent audio interface, a stable studio PC, and a neutral monitoring environment. If any one of those three isn’t right, you’ll find yourself constantly compensating for issues that you can’t hear but can feel in your mixes.

I4studio provides custom-built studio PCs configured for stable DAW performance, audio interfaces with precise gain control, and acoustic solutions that make your monitoring environment more accurate. Check out the studio PC configurations for an overview of systems tailored to music production, or read the home studio essentials guide if you want to review your entire setup. Contact us at i4studio.nl for personalized advice on which hardware best suits your workflow and budget.
Sources
Would you like to learn more about gain staging and related techniques? These resources provide technical insights and practical workflows:
- Gain Staging in Your DAW Software
- Gain Staging in Your DAW Software
- What Is Gain Staging and How Can It Help You Mix? | MusicRadar
- Gain Staging: From Recording to Mix – The Complete Workflow – Sonarworks Blog
- What Is Gain Staging? – MusicProductionWiki
- What is gain staging? – Wisseloord Studios
Frequently Asked Questions
What is gain staging in a DAW?
Gain staging is the process of managing the signal level at every point in your audio chain, from clip gain and preamp to plugin inserts, buses, and the master output. The goal is to ensure that each component operates within its optimal range, without unintended clipping or noise.
What is a good operating point for gain staging?
The most commonly used operating level for individual DAW tracks is −18 dBFS RMS, with peaks of up to −3 dBFS for transients. This level corresponds to 0 VU in professional analog equipment and provides plugins with a predictable input signal.
What dBFS level is best for gain staging?
For individual tracks, −18 dBFS RMS is the widely accepted standard. Subgroups may peak slightly higher, but keep the master pre-limiter below −6 dBFS to preserve sufficient headroom for the limiter and mastering.
How do you do gain staging step by step?
Set all faders to unity, use clip gain to bring tracks down to −18 dBFS RMS, check the output of virtual instruments, build the plugin chain with input/output matching for each plugin, and finally check the master headroom. Perform bypass checks after each step to confirm that plugins are actually improving the sound rather than just making it louder.