
Briefly:
- Decoupling separates mechanical components in a studio to minimize sound transmission.
- The use of techniques such as floating floors and walls with flexible joints improves insulation.
Decoupling is the technique of mechanically separating the structural elements of a studio from one another to prevent vibrations and sound from traveling through walls, floors, and ceilings. Without decoupling, every screw, every concrete joint, and every piece of wood transmits vibrations directly to the rest of the building. This compromises your recording quality in a way that no equalizer or plugin can fix afterward. The explanation of decoupling in studio design starts with one principle: break the direct mechanical connection, and you stop the transmission of structural noise. In this guide, I4studio explains how it works, which techniques to use, and what benefits it brings to your sound.
What techniques are used for decoupling in studios?
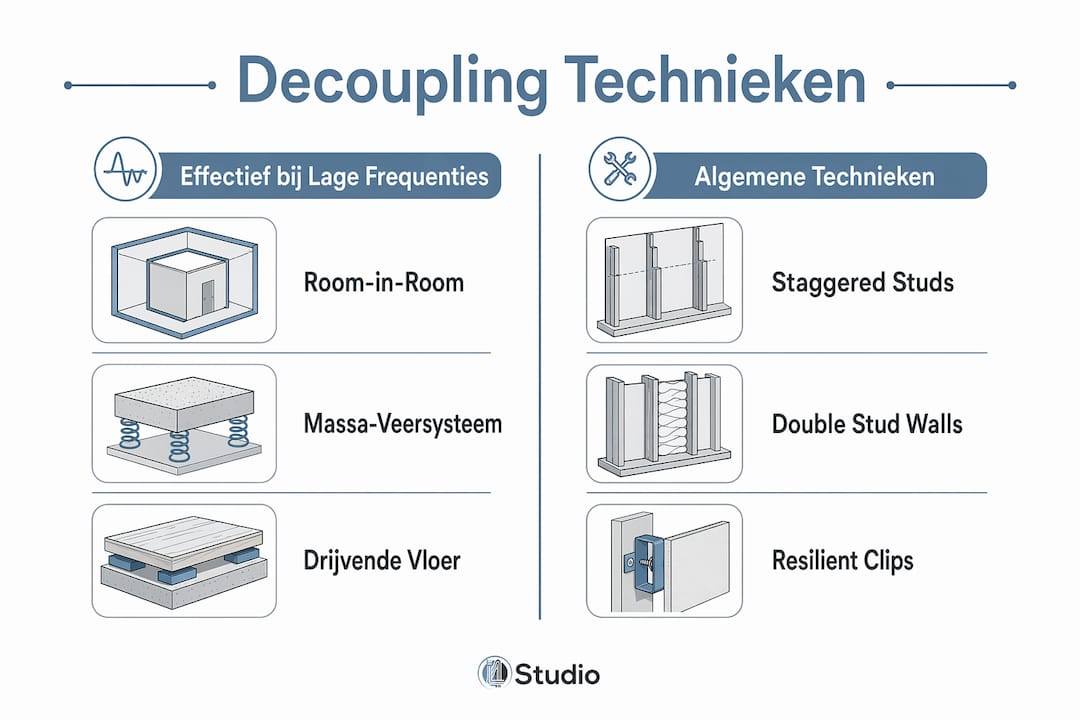
Decoupling breaks the direct connection between studio elements and the surrounding building to minimize vibration and sound transmission. The most commonly used methods are double-stud walls, floating floors, and isolation clips. Each of these techniques works on the same principle: replacing a rigid connection with an elastic or air-filled gap.
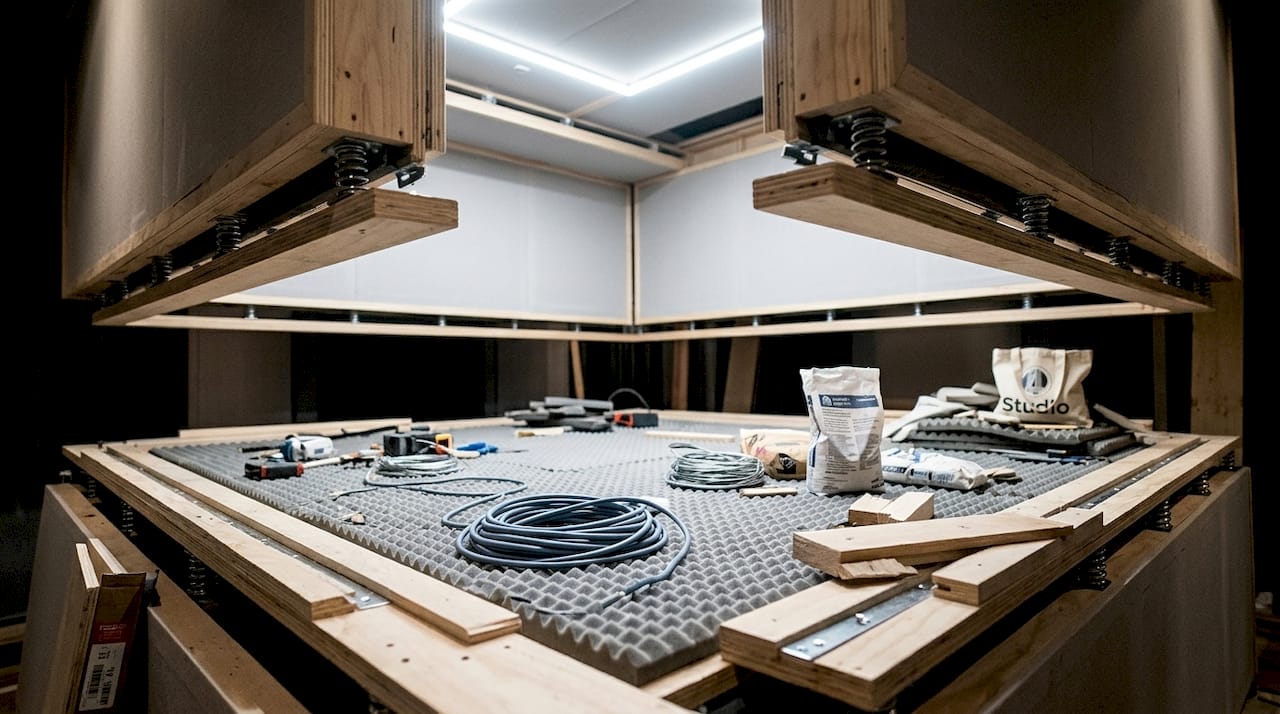
Room-within-a-room structures
The most effective form of decoupling is the “room-within-a-room” approach. You literally build a second room within the existing space, with the interior walls, floor, and ceiling making no direct contact with the outer structure. The air gap and the flexible joints between the two shells together form the sound barrier. This is the method professional recording studios use when maximum sound isolation is required.
Staggered studs and double-stud walls
With staggered studs, you alternate the studs in a wall so that the interior and exterior sheathing are never attached to the same stud. With a double-stud wall, you build two completely separate wall frames with an air cavity between them. Both methods prevent vibrations from traveling directly from one side to the other. The downside is that you sacrifice space: a double wall can easily be 15–25 centimeters thicker than a standard construction.
Resilient clips and spring isolators
Resilient clips and spring isolators prevent rigid connections in walls and ceilings. You do not attach the drywall directly to the frame, but rather using these clips, which absorb vibrations before they reach the frame. Neoprene pads work in the same way under floor structures and beneath heavy equipment. The result is a significant reduction in vibration transmission, even at higher sound pressure levels.
Other commonly used materials and techniques include:
- Mass-loaded vinyl (MLV): a heavy, flexible material that you install between layers of drywall or under flooring to add mass without creating rigid joints.
- Viscoelastic compound: an adhesive-like damping layer that you apply between two layers of drywall to reduce resonance.
- Acoustic sealant and gaskets: sealing materials for joints, frames, and connections where air leaks compromise decoupling.
- Flexible pipe connections: for ventilation and systems that would otherwise transmit vibrations through the piping.
Pro-tip: Always use a combination of mass and decoupling. Mass alone stops noise, but without decoupling, the structure will still transmit vibrations. The combination of both yields the best results.
Damping materials such as viscoelastic compounds complement decoupling for mid- and high-frequency ranges, but they do not solve bass problems. That requires a different approach, which you’ll find in the next section.
Why is low-frequency insulation so difficult?
Low frequencies are the biggest challenge when it comes to decoupling in music production. Bass sounds have a long wavelength and a lot of energy. That energy penetrates building materials and travels far through walls and floors, even if you’ve already insulated extensively. Effective low-frequency insulation requires greater mass and thicker walls than insulation for mid- and high-frequencies.
The physical principle behind this problem is simple: the lower the frequency, the more mass and distance you need to stop the wave energy. A thin wall with good isolation clips works fine for vocals and guitars, but lets bass drums and subwoofers pass through virtually unimpeded. Experts emphasize that bass isolation is the most difficult component of any decoupling project, with thick cavities and heavy materials as minimum requirements.
The mass-spring-mass system
The solution for low-frequency isolation is the mass-spring-mass system. This system consists of two heavy masses, separated by an elastic element such as spring isolators or an air gap. The first mass absorbs the energy, the spring dampens the transmission, and the second mass blocks whatever still gets through. A floating floor with spring isolation is a classic example of this principle in practice.
Points to Consider for Low-Frequency Decoupling:
- System resonance frequency: Every mass-spring-mass system has its own resonance frequency. Make sure it is lower than the frequencies you want to isolate; otherwise, the system will actually amplify the sound.
- Floor weight: floating floors are heavy. Always check to make sure the building’s structural framework can support the additional weight.
- Cavity thickness: the thicker the air cavity between the two masses, the lower the resonance frequency and the better the isolation of deep bass.
- Flanking paths: Low-frequency sound always finds the weakest link. Also check pipes, ventilation ducts, and connections for vibration transmission.
Soundproofing for studios starts with a clear understanding of which frequencies you want to block. Someone who records only vocals has different needs than a drummer or producer who works with heavy bass synthesizers.
How can you effectively use decoupling in your studio?
Implementing decoupling requires a structured approach. If you start without a plan, you may overlook supporting routes or choose materials that aren’t suitable for the structure. The steps below apply to both a home studio and a professional recording space.
Analyze the existing structure. Identify the materials used in the walls, floor, and ceiling. Concrete, wood, and steel each conduct vibrations differently. Know what you have before you add anything.
Determine your insulation goal. Do you want to prevent sound from leaking outside, or do you also want to keep external vibrations out? Both goals require decoupling, but the priorities in terms of material selection differ.
Choose the appropriate decoupling technique for each surface. Walls, floors, and ceilings each require their own approach. A floating floor with neoprene pads, resilient clips in the ceiling, and staggered studs in the walls together form a complete system.
Block off all flanking routes. Air leaks around seams and cracks greatly reduce the effectiveness of decoupling. Use acoustic sealant around door frames, gaskets on doors, and flexible connectors on pipes.
Insulate mechanical systems separately. Ventilation and ductwork are common sources of noise leakage. Install ventilation ducts on insulation pads and use flexible connectors at every point where they pass through a wall or floor.
Combine decoupling with acoustic treatment. Decoupling blocks sound from traveling from outside to inside and vice versa. Bass traps, diffusers, and acoustic panels treat the sound within the room itself. Both are necessary for a professional result.
Measure the result. Use a sound level meter or a measurement microphone with analysis software to check whether the insulation is effective. Taking measurements before and after the work is done will give you concrete data on the improvement.
Pro-tip: Start with the floor. A floating floor provides the greatest benefit in terms of low-frequency insulation and forms the foundation for the rest of the decoupling project. If you skip the floor and only address the walls, you leave the main transmission path open.
Acoustic treatment of your studio is a separate process from decoupling. Don’t confuse the two: decoupling isolates, while acoustic treatment corrects the sound within the room.
What are the benefits of decoupling for studio users?
Decoupling delivers measurable improvements for any musician or studio owner who takes sound seriously. The benefits go beyond just reducing outside noise.
- Higher recording quality: without vibration transmission through the structure, you capture a cleaner signal. Microphones do not pick up structural noise from floors or walls, which is immediately audible in the recording.
- Fewer disruptive noises: traffic, neighbors, and HVAC systems no longer reach the recording room through the building structure. This saves editing time and prevents failed takes.
- Better control over the acoustics: a well-decoupled room behaves predictably. You know what you’re hearing in the monitors because external influences have been eliminated.
- Equipment protection: Continuous vibrations can eventually damage sensitive components in microphones, speakers, and studio electronics. Decoupling extends the lifespan of your gear.
- Consistent working environment: A stable acoustic environment ensures that every session is comparable. This is valuable for long-term projects where you compare recordings from different days side by side.
A room-within-a-room construction is more expensive than simpler methods, but provides the most predictable sound insulation for professional studios. The investment pays for itself in the form of fewer re-records and better final results. For home studios, resilient clips and a floating floor are already a big step forward without requiring a complete new construction project.
Your studio’s soundproofing ultimately determines how professional your final product sounds. Decoupling is the technical foundation for this—not just an optional extra.
Key insights
Decoupling is the most effective technique for preventing vibration and sound transmission in a studio, and it only works if you combine mass, elastic connections, and an airtight seal.
| Item | Details |
|---|---|
| Definition of decoupling | Mechanical separation of structural elements to prevent the transmission of vibration and noise. |
| Best Technology | Room-within-a-room provides the most predictable soundproofing for professional studios. |
| Low-frequency isolation | Requires a mass-spring-mass system with thick cavities and heavy materials. |
| Flanking Routes | Seams, doors, and pipes must always be sealed; otherwise, they will compromise the entire system. |
| Combination with Acoustics | Decoupling provides insulation; bass traps and panels treat the sound within the room. |
Decoupling is still underestimated
I see it time and time again: musicians invest thousands of euros in microphones and preamps, but skip the step of decoupling because it sounds “too technical” or “too expensive.” The result is a recording that looks good on paper but, in practice, is riddled with subtle vibration-induced coloration that you only hear when you compare it to a truly isolated room.
The most common mistake is to start installing acoustic panels while the structure is still completely rigid. Panels address reflections within the room, but they don’t block structural noise. Anyone living in an apartment above a busy street will hear the difference right away. Decoupling and acoustic treatment are two separate layers, and you have to tackle them in the correct order.
Another thing I often see is that people stop at the walls and forget about the floor. In most cases, the floor is the main path for sound transmission. A simple floating floor with neoprene insulation pads under a second layer of plywood already provides a noticeable improvement, even without a complete renovation project.
For those on a tight budget: start small, but start right. Resilient clips in the ceiling, acoustic sealant at all seams, and a floating floor together already provide a solid foundation. Then scale up by adding extra mass to the walls. If in doubt, consult a specialist like I4studio, who understands both the acoustic aspects and the technical implementation. This will help you avoid costly mistakes that you’ll have to fix later.
– harold
Studio equipment and acoustic solutions from I4studio
Proper decoupling starts with the construction, but the choice of your gear and acoustic materials determines the final result.

I4studio offers a wide range of studio acoustics products to complement your decoupling project, from acoustic diffusers to insulation materials for walls and ceilings. Just getting started? I4studio’s guide to studio gear for beginners helps you make the right choices without spending too much money on equipment that won’t improve your setup. From custom studio PCs to acoustic panels: I4studio combines technical expertise with a practical product lineup for musicians who are serious about getting their sound right.
Frequently Asked Questions
What is decoupling in a studio?
Decoupling is the mechanical separation of structural elements in a studio to prevent the transmission of vibrations and sound through walls, floors, and ceilings. Techniques such as resilient clips, floating floors, and double-stud walls are the most commonly used methods.
How does decoupling differ from acoustic treatment?
Decoupling isolates the studio from external noise and vibrations transmitted through the structure. Acoustic treatment, such as bass traps and diffusers, corrects the sound within the room itself. Both are necessary, but decoupling always comes first.
Which decoupling technique works best for low frequencies?
A mass-spring-mass system, such as a floating floor with spring isolators, provides the best low-frequency isolation. Low frequencies require large mass and thick cavities; surface treatments alone are not sufficient.
Can I do decoupling myself in a home studio?
Yes, simple measures such as resilient clips, neoprene pads, and sealing seams can be done on your own. For more complex structures, such as a room-within-a-room, professional advice is highly recommended.
How much does soundproofing cost in a studio?
The costs vary greatly depending on the method and the size of the space. Simple measures such as clips and sealant are relatively inexpensive. A full “room-within-a-room” construction requires a substantial budget but provides the most predictable insulation for professional use.