Those looking for home studio setup ideas often want one thing: a space that is sound-reliable, pleasant to work in and leaves room for creativity. This article offers concrete, actionable advice for every step – from room selection to monitor positioning, from acoustic treatment to the right computer and cable management. It targets musicians, producers and content creators who want a professional working environment, without unnecessary theory and with practical examples.
Start with a plan: goals, budget and workflow
The best setup starts with clear choices. First determine the purpose of the studio: will it be a recording and mixing space, a vocal booth, a podcasting studio or a hybrid space for audio AND video? Next comes the budget and desired workflow. These three elements drive almost all decisions: acoustics, equipment and furniture.
- Purpose: recording, mixing, streaming, video editing or all at once?
- Budget: set priorities – monitoring and acoustics first, aesthetics can be later.
- Workflow: how many screens, hardware controllers, live instruments and guests?
A producer who mixes primarily invests more in monitors and acoustics. A singer-songwriter who records at home spends part of the budget on microphones, preamps and reflection mitigation. For creators who do a lot of rendering or video editing, a powerful computer is essential – an area in which specialized vendors such as I4studio offer equipment and advice, from audio- to broadcast-grade systems.
Choose the right space
Not every room is ideal, but with smart choices, much is possible.
Size and shape
A medium-sized room (about 10-20 sq. ft.) works well for most home studios. Elongated rooms can be tricky due to standing waves, but that can be solved with focused bass absorption and positioning. Square rooms are most challenging because of symmetry and strong low-frequency problems.
Location in house
- If you are looking for quiet, it is preferable to choose a room away from street noise and slamming doors.
- Windows are fine for light, but glass reflects high frequency and transmits sound to the outside. Double-glazed windows or heavy curtains help.
- Below or above neighbors: insulation and arrangements are essential. Broadcast-level insulation requires structural modifications, but for home studios, often draft strip and massing works surprisingly well.
Acoustic treatment: the crucial factor
Acoustics make or break a studio. Even with excellent monitors, mixes sound wrong in an untreated room. What follows are concrete, applicable steps.
What is the purpose of acoustic treatment?
The goal is twofold: reduce transient reflections (for clearer stereo imaging and articulation) and manage low-frequency problems (for more accurate bass reproduction). In doing so, there are two main types of solutions:
- Absorption – reduces reflections and reverberation (mid/high).
- Diffusion – refracts and disperses sound waves rather than absorbing them, keeping the room alive without harsh reflections.
Practical approach by area
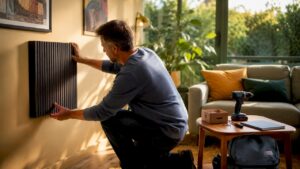
- First reflection points: treat with absorbent panels on the walls along the listening position (side walls) and on the ceiling. A simple test: have someone walk along the wall with a mirror; where one sees the speakers in the mirror, place a panel.
- Bass traps: Place them in corners (floor-to-ceiling and wall-to-wall corners). Low frequencies concentrate there and corners grab a lot of the energy.
- Back wall: A combination of absorption and diffusion often works best. Complete absorption can sound stale; diffusion keeps the space open.
- Curtains and furniture: Heavy curtains, bookcases and sofas can help, especially if one does not want to spend money on professional panels right away.
Materials and damping values
Panels are often rated by an NRC or absorption value. For mid/high frequency, foam and mineral wool are effective; for low frequencies, thicker, denser materials or specially designed traps are better. For professional solutions, in addition to computers, I4studio provides acoustical treatment materials and customized advice so that the treatment strategy fits the room.
Monitoring and speaker placement
Good monitors and proper positioning deliver immediate improvements in mix quality.
Choice of monitors
Monitors should fit the room. Large woofers in a small room can produce excessively low energy. For producers working with low-end-heavy material, a combination of nearfields and a sub correctly configured can help. A good audio interface and low-latency setup also remain essential.
Positioning
- Create an equilateral triangle: the two monitors and the listening position form an equilateral triangle.
- Point monitors slightly inward (toe-in) so that the center between the speakers faces the listening position.
- Height: tweeters at ear level when seated.
- Distance from rear wall: ideally at least 0.5-1 meter, with absorption behind the monitors to reduce comb filter effects.
Reference mixes and control
Use reference tracks and listen on multiple systems: monitors, headphones, smartphone and car radio. This helps detect inaccuracies. A good computer and audio setup makes A/B testing easy; vendors such as I4studio provide systems that work seamlessly with DAWs and audio interfaces for stable monitoring and high sample rates.
Furniture, ergonomics and layout
Comfort and efficiency increase productivity. Smart layout prevents hassle while working.
Desk and chair
- Invest in an ergonomic chair; long sessions require good support.
- The desk should accommodate keyboard, controller and monitors without vibration. Since monitor resonance and table resonance can cause problems, a sturdy desk with isolation pads can be helpful.
Screen and screen placement
For video editing or large sessions, two monitors are often practical: one for the DAW timeline and one for plugins or references. For hybrid makers, a third screen for playback is useful.
Storage and accessibility
Riding racks or shelves for plug-ins, cables, microphone stands and accessories keep the workspace tidy. Label cables and store accessories in bins; chaos slows creativity.
Computer, audio interface and hardware
The right machine and I/O are the backbone of a modern home studio.
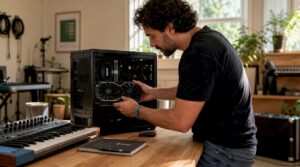
What does one look for in a studio computer?
- CPU: More cores and higher clock speed help with instruments and plugins. Multicore CPUs speed up rendering and running many tracks simultaneously.
- RAM: At least 16 GB for audio, 32 GB or more for große sample libraries and video rendering.
- Storage: SSD for OS and DAW projects; large NVMe drives for sample libraries reduce load times.
- Cooling and quiet operation: Fan-noise can be distracting when recording. Good airflow and quiet power supply are important.
Especially for audio and video professionals, I4studio builds and delivers custom audio, video and rendering computers optimized for DAW performance, low latency and reliable long sessions. They also provide configuration and optimization support, so one can get started right away without time-consuming tuning.
Audio interface and I/O
A reliable audio interface with sufficient inputs/outputs and stable drivers is essential. Notice:
- Preamp quality for microphones
- AD/DA conversion quality for monitoring
- MIDI and digital I/Os for modern workflows
- DSP or onboard processing for monitoring without latency
Cable management, power and grounding issues
Good cable management prevents noise, interference and frustration. Practical rules:
- Use short, well grounded power cables and quality audio cables.
- Keep audio cables and power cables separate; cross them perpendicularly if they must cross each other.
- Use a professional stage box or breakout for multiple inputs to reduce knotting.
- For hum and ground loops: try one grounding point and possibly use a ground elevator on DI boxes where necessary (with caution).
A UPS (Uninterruptible Power Supply) protects equipment from power outages and surges – useful during long takes or renders.
Sound insulation vs. acoustic treatment
People often confuse insulation and acoustic treatment. They complement each other but serve different purposes.
- Insulation limits sound from inside to outside and vice versa (solid walls, double walls, decoupling).
- Acoustic treatment improves the sound within the room (absorbers, traps, diffusers).
For home studios, the most cost-effective improvements begin with treatment. If one frequently records loud drums or neighbors give problems, isolation follows. I4studio can advise in determining which steps are cost-effective and which technical solutions fit the desired level of isolation.
Lighting, background and video considerations
For content creators who also shoot video, light and background are crucial. Light changes the mood and reads skin tones better in livestreams and recordings.
- Use diffused key-lights with color temperature setting (warm/cool).
- LED panels are energy efficient, do not get hot and can be adjusted in intensity and color.
- Watch for reflections from monitors on windows or shiny surfaces.
- Provide a neat, recognizable background; acoustic panels can serve as a visual style with graphic prints.
Practical layouts and examples
For inspiration, following are three common home studio layouts with details:
1) Compact singer-songwriter studio (1-person)
- Room: 12 m²
- Essentials: nearfield monitors, audio interface with 2 preamps, one condenser microphone, bass traps in corners, first reflection panels along walls and ceiling, ergonomic desk and good chair.
- Workflow tip: use a template in the DAW with pre-set bus routing and vocal chain to record faster.
2) Producer / beatmaker setup
- Room: 15-20 m²
- Essentials: dual monitors/ultrawide display, powerful computer (32+ GB RAM, NVMe storage), controller/keyboard, monitoring controller and subwoofer with correction (room correction or manual).
- Workflow tip: establish fixed locations for controllers, and store sample libraries on separate SSDs for quick access.
3) Podcast / streaming + video creator
- Room: flexible, 12-18 m²
- Essentials: dynamic or broadcast condenser mic with boom arm, audio interface with talkback, battery-induction-free lighting, backdrop with sound absorbers, stream PC or powerful workstation for simultaneous recording and export.
- Workflow tip: multi-track recording for post-processing and backups; local recording for security, plus stream to platform.
Budget-friendly home studio design ideas
A professional look and good sound don’t have to bankrupt you. Convenient, affordable solutions:
- DIY bass traps: fill solid wooden frames with rock wool or glass wool and upholster with breathable fabric.
- Use thick curtains and bookcases as diffusers/absorbers.
- Start with one good monitor set and upgrade to a sub or reference set later.
- Buy a refurbished audio interface or used preamp with good reviews.
- Online communities and local makerspaces often offer exchanges or bargains on studio furniture and gear.
Construction and scalability: thinking for the long term
A smart home studio scales with growth. Invest first in components that make the most difference: monitors, acoustics and a stable computer. Later, expand with microphone collections, outboard gear and hardware controllers.
An example of scalability: choose an audio interface with sufficient ADAT or digital expansion capabilities – that way, one adds additional preamps later without replacing the entire workflow. I4studio often advises on this point: a future-proof configuration can save a lot on long-term investment costs.
Tips from practice – common mistakes and smart solutions
- Mistake: push monitors against the wall. Solution: create air behind monitors or place absorption to prevent reflections and bass buildup.
- Error: too much absorption on all walls (musty room). Solution: combine absorption with diffusion, especially on the back wall.
- Mistake: choosing cheap tools instead of good listening equipment. Solution: invest in reliable references and learn to mix on multiple systems.
- Error: neglect backup and storage. Solution: configure automatic backups and redundant storage (RAID or external backups).
“A good mix starts with a good listening environment; technique and gear follow after.” – advice from experienced studio operators
Case: Hybrid home studio for music and video
A creator wanted to record and do high-quality video for socials at the same time. The solution combined:
- A powerful workstation from I4studio with fast NVMe storage for video projects and sample libraries.
- Adjustable monitors and a subwoofer with room correction for accurate audio.
- Sound absorbing panels with graphic print as visual backdrops for video.
- LED light setup that is controllable via DMX or software for different scenes.
Result: the creator could quickly switch from audio recording to video rendering, with stable performance and a recognizable visual style. The combination of hardware and acoustic treatment ensured consistent audio quality, both on screen and in streaming.
Checklist for a first home studio setup
- Define purpose and workflow (recording, mixing, video).
- Choose the best available space (least reflections, quiet location).
- Invest in monitoring and start with reflection points and bas traps first.
- Choose a computer with sufficient CPU, RAM and fast storage – let the configuration match the workflow.
- Install reliable audio interface and drivers; test latency and performance.
- Organize power and cable management; add UPS for security.
- Make ergonomic choices: chair, desk and screen height.
- Test with reference material and listen on multiple systems.
How can professional advice help?
For makers who want more security, professional advice often pays off. An expert can measure, analyze and provide a customized treatment plan, including placement and material selection. In addition to hardware, I4studio also offers advice and support on both acoustic setup and proper computer configuration – useful for those who want to save time and mistakes technically.
Summary
A good home studio is created by conscious choices: a clear objective, a suitable space, thoughtful acoustic treatment, reliable monitoring and a powerful computer. Priorities are essential – start with monitoring and acoustics, provide a stable computer and audio interface, and work incrementally on isolation and aesthetics. For customized computers and advice on more complex setups, turn to specialized vendors such as I4studio, who provide systems and solutions for audio, video and broadcast environments.
Frequently Asked Questions
Which room is best for a home studio?
A rectangular room of 10-20 sq. ft. usually works best; avoid complete squareness whenever possible. Choose a room away from noise and with enough room for monitors and handling. With good acoustic measures, almost any room can be used.
Should one invest in monitors or acoustics first?
Acoustics and monitors belong together, but if one must choose: start with good monitoring and immediately treat first reflection points and bass problems. Bad monitors in a treated room sound less problematic than good monitors in an untreated room.
Is a subwoofer necessary?
Not always. For many producers, nearfield monitors suffice. A subwoofer helps with material with lots of sub-bass, but requires proper integration and room correction. Test without and add if references indicate sub extension is lacking.
How much RAM and storage does a studio computer need?
For basic audio work, 16 GB is often the minimum; 32 GB or more is recommended for large sample libraries or video editing. NVMe SSDs speed up load times significantly, and a separate SSD for sample libraries prevents IO bottlenecks.
Is it possible to make acoustic panels yourself?
Sure. Using wood frames, mineral wool and breathable fabric builds effective panels and bass traps. Pay attention to safety measures when working with insulation materials and choose materials with the right density for low frequencies.
With these practical home studio setup ideas, one can build a reliable, productive and inspiring workplace step by step. For those looking to outsource technical choices or seeking high-performance studio computers and customized advice, I4studio offers specialist solutions and support.