Anyone setting up a home studio faces one crucial choice: choosing home studio recording microphones largely determines the final sound quality. The right microphone lifts vocals, instruments and podcasts to a professional level; the wrong microphone imposes limitations that are difficult to fix later. This guide helps producers, musicians and content creators step by step with that choice – from technical terms and microphone types to acoustics, interfaces and practical testing tips.
Why the microphone makes such a big difference
The microphone is the first point of contact between sound and the recording chain. A well-chosen microphone captures detail, nuance and character of a voice or instrument, while a wrong choice amplifies unwanted frequencies or omits important elements. In a professional workflow, microphone response is almost as decisive as the performance itself. Moreover, microphone choice affects all subsequent steps: preamps, A/D conversion, mixing and mastering.
In a home studio, space is also a factor – a perfect condenser microphone will not automatically sound good in a reverberant living room. That’s why it’s important to combine microphone selection with attention to acoustics and signal chain.
Important basic concepts every home producer should know
Before deciding which microphone is the best fit, it helps to briefly and practically explain a few technical terms.
- Polar pattern (directional characteristic): determines from which direction the microphone picks up sound. Common: cardioid (front), omni (all around), figure-8 (front and back).
- Frequency response: indicates which frequencies are registered stronger or weaker. A “flatter” response sounds more neutral; presence boosts intelligibility.
- SPL (Sound Pressure Level): how loud a source can be before the microphone starts to distort. Important with drums and amplifier boxes.
- Sensitivity: how easily the microphone converts sound into an electrical signal. Low sensitivity requires more preamp gain.
- Impedance: match between microphone and preamplifier; modern interfaces usually control this well.
- Proximity effect: with directional microphones (such as cardioid), the closer the source, the stronger the low frequency.
Types of microphones and when they are used
Dynamic Microphones
Dynamic microphones are rugged and can handle high SPL. They use no external power supply and tend to be less sensitive to room reflections. Therefore, they are popular for:
- Live vocals (rough environments)
- Electric guitar amps
- Drum sets (snare, toms)
A dynamic is often the best choice when the room is not optimally treated or when one wants a “coarse,” direct sound.
Condenser Microphones
Condenser microphones are more sensitive and record more detail. They require phantom power (+48V) and preamps with sufficient gain. Condensers excel at:
- Vocal recordings with lots of nuance
- Acoustic guitar, piano, strings
- Clear drum and overhead recordings
In home studios, a good condenser microphone is a worthwhile investment, if combined with acoustic treatment or a reflection filter for vocals.
Ribbon Microphones
Ribbon microphones have a warm, natural sound and tend to be less bright in the high frequencies. They are more sensitive to loud noises and require special preamplifiers. Use them for:
- Classical vocal or acoustic recordings where warmth is desired
- Overdrive-faced amps for ‘vintage’ sound
In a home studio, a ribbon microphone can shine, but the risk of damage and preamp requirements require careful application.
USB Microphones
USB microphones have built-in A/D conversion and are plug-and-play with a computer. They are useful for podcasting, live streaming and quick demo recordings. Advantages:
- Easy setup without external interface
- Cheap and portable
Disadvantages are limited upgrade capabilities (you commit to built-in preamps/and converters) and sometimes inferior sound quality compared to a good XLR chain.
XLR Microphones
XLR microphones are the standard in professional recording. They require an audio interface or separate preamp, but offer maximum flexibility and quality. For those serious about recording work, XLR is usually the preferred choice.
Which microphone suits which purpose?
The choice depends heavily on source (voice, acoustic guitar, amplifier), space and desired sound. Here is a practical overview by application.
Vocals (vocals and voice-over)
For vocals in a treatable room, a condenser microphone is often ideal because of detail and clarity. A cardioid condenser with a slight presence boost around 3-6 kHz helps intelligibility. For rawer vocal styles or in less treated spaces, a dynamic (such as a broadcast or SM7B-like model) may work better because it picks up less room resonances.
Pop, rock and lead vocals
A condenser for clarity; possibly a dynamic for stage-like, warm sounds. Pop producers sometimes choose a “tube-like” condenser for extra body.
Podcasting and streaming
USB microphones are popular for convenience, but an XLR dynamic microphone with a good interface immediately provides better sound quality and flexibility. For broadcast, one often hears dynamic models because they pick up a lot of direct energy and less ambient noise.
Acoustic guitar
A small aperture condenser or a combined near-coincident stereo setup (XY or ORTF) produces natural, detailed results. Positioning determines much more than microphone type: 12-20 cm from 12th fret is a good starting point.
Electric guitar amps
A dynamic close to the speaker cone delivers punch; a condenser a little further away gives more ambiance. Sometimes two microphones are combined for hybrid sound.
Drums
Snare and toms: dynamics. Overheads: condensers. Bass drum: dedicated kick microphones or dynamic with high SPL.
Space and acoustics: often greater effect than an expensive microphone
An expensive microphone in a bad room often sounds worse than a midrange microphone in a well-treated room. For home studios, the following priorities apply:
- Treat reflection points around the recording site (first reflection points).
- Use bass straps in corners for layer control.
- For vocals: a reflection screen or small iso-booth element helps isolate direct sound.
I4studio provides not only hardware, but also advice and customized acoustic solutions for home and project studios. For those with limited space, a combination of wall absorbers and a portable vocal booth can already give great improvements.
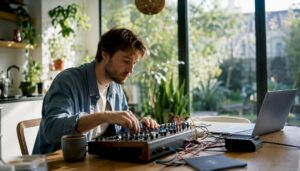
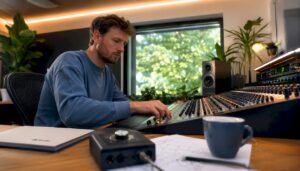
Interfaces, preamplifiers and the importance of gain staging
A microphone by itself is only the beginning. The preamp, A/D converter and computer play an equally important role.
- Microphone preamp: determines how much noise is added and how much gain is available. Dynamic microphones often require a lot of gain – pay attention to noise floor of the preamp.
- Phantom power: condenser microphones need +48V; make sure the interface provides this.
- A/D conversion: good converters preserve detail and stereo imaging. You often hear the greatest difference in quality between inexpensive and quality converters in complex, dynamic performances.
- Sample rate and bit depth: 48 kHz / 24-bit is a good standard; higher sample rates have advantages in some workflows, but enlarge file formats.
I4studio builds workstations and audio PCs optimized for low latency and stable recording; which helps when recording multiple tracks simultaneously at high sample rates. When in doubt about which interface or preamp is the best fit, I4studio offers advice and configurations tailored to the recording project.
Practical testing and selection procedures
A microphone purchase is best based on hands-on testing. Here’s a test plan to make more focused decisions:
- Compose a reference recording (30-60 seconds) with voice or instrument that is representative.
- Try multiple microphones in identical position and settings (same distance, same preamp settings).
- Make A/B recordings and listen back on different systems: studio monitors, headphones and even phone speakers – each reveals different details.
- Listen for presence, low-response, noise and how the microphone handles plosives or sibilants.
- Check if the microphone has enough headroom for peaks (SPL) or if compression/clipping is needed.
If there is no opportunity for testing, it is advisable to rent or request a demo. I4studio offers support and can often arrange demo equipment or suggest testends based on the project and space.
Common mistakes and how to avoid them
- Choosing a microphone purely on price or reputation without considering one’s space and source – solution: test in one’s own environment or seek advice.
- Recording too close without pop filter – leads to plosives and exaggerated low due to proximity effect.
- Forgetting that preamp and A/D converter are equally important – invest in interface or preamp if microphone is already good quality.
- Insufficient attention to monitoring and latency – a poor monitoring setup hinders performance.
Budget advice: what to save on and what not to save on
For many home studios, prioritize room handling and a stable interface over a top-notch microphone. A practical trade-off:
- Budget €100-€300: good USB microphones and entry-level XLR condensers exist; perfect for podcasts and demos.
- Budget €300-€800: here are many workhorse condensers and dynamics; applicable for semi-professional projects.
- Budget €800+: professional condensers and ribbons; consider this investment only after room and preamplification are in order.
A successful home producer often spends first on acoustics and interface; a mid-range microphone then delivers the most return.
Checklist When Purchasing
- What is the recording purpose (vocal, instrument, drum, podcast)?
- What is the size and treatment of the space?
- Already have an interface or preamp with sufficient gain and phantom power?
- Is the mic XLR or USB desired (future upgrade plans)?
- How much SPL should the microphone be able to handle?
- Are accessories needed: pop filter, shockmount, cables, stands?
- Can the microphone be tested in your own space or rented for tryouts?
Case Studies: Three common home studio setup suggestions
1) Singer-Songwriter Home Studio
Goal: warm, detailed vocals and acoustic guitar recordings.
- Microphone: condenser cardioid for vocals; small diaphragm for guitar or a second condenser in stereo.
- Interface: 2-in/2-out interface with good preamps and low latency.
- Acoustics: reflection treatment around the recording location, bass traps in corners.
- Computer: stable DAW system with sufficient CPU and SSD (I4studio provides prepared workstations well suited for this).
2) Podcaster / Streamer Setup
Purpose: clear speaking voice, minimal background noise.
- Microphone: broadcast-dynamic or USB condenser with cardioid pattern.
- Accessories: pop filter, shockmount and a properly set recording environment (room with absorption panels).
- Interface/Audio processor: simple audio interface or mixer; direct monitoring is important.
3) Band / Multi-Instrument Recordings at Home
Purpose: recording multiple sources with high SPL.
- Microphones: dynamics for snare/amps, condensers as overheads/room mics.
- Interfaces: multi-channel interface with stable drivers and sufficient preamps. Consider additional preamps for character.
- Computer: powerful multi-track audio PC with low latency (I4studio configures systems with real-time performance and high I/O capacity).
Additional tips: mic placement and creative techniques
- Use off-axis placement to reduce sibilants and plosives without heavy EQ.
- Combine close-micing with a room mic to get a mix of direct sound and ambience.
- For stereo imagery: try ORTF or XY for natural width without phase problems.
- Experiment with distance and angle; small changes (5-10 cm) can make big differences.
Why professional advice pays off
The combination of microphone, preamp, room and computer determines the final result. Only an integral approach – microphone selection + acoustics + proper interface + stable computer – delivers consistent, professional recordings. I4studio helps with such integral solutions: from personal consulting and demos to custom-built audio/video workstations and acoustic treatments. This saves time and avoids buying expensive equipment that does not function optimally in one’s own situation.
Conclusion
The process of choosing a home studio recording microphone should be practical and phased: first determine which sources and spaces are central, then prioritize (acoustics and interface), and finally test microphones in the home setting. Dynamics, condensers, ribbons and USB mics each have their strengths; the best choice depends on source, space and workflow. Hands-on testing, good gain staging and attention to acoustics are often more important than just paying attention to model.
For those who want to speed up the process or seek expert advice, I4studio offers support in putting together suitable microphones, interfaces and even optimized computing and acoustic solutions – so that the chosen microphone can actually live up to its potential.
Frequently Asked Questions
What type of microphone is best for singing in a small, non-treated room?
In a small, untreated room, a dynamic microphone or a cardioid condenser with a reflection screen often works best. Dynamics are less sensitive to room reflections; condensers offer detail but require acoustic treatment or an isolation solution.
Should one choose USB or XLR in a home studio?
USB is ideal for simple workflows (podcasting, streaming) and quick setups. XLR offers more flexibility and quality through separate preamps and converters; it is preferred for serious recording projects and future upgrades.
How much money should one spend on a microphone for good home recording?
A functional home studio can start well with microphones in the €150-€800 range, combined with decent acoustics and a good interface. Professional microphones above €800 can provide additional nuance, but provide less efficiency when other parts of the chain fall short.
Does an expensive microphone help if the space is bad?
An expensive microphone may provide some improvement, but will not solve the fundamental problems of an untreated room. Investing in acoustics or mobile insulation usually provides greater effect than the highest-end microphone.
Can I4studio help test or put together a suitable setup?
Yes. I4studio offers customized advice, demo opportunities and supplies configured audio and video workstations. For those who are unsure between microphones or want to know which interface and computer is the best fit, professional advice can save a lot of time and money.